
Ducati Diavel Owners Manual: Setting menu
This menu is used to enable/disable and set some motorcycle functions.
To access the "setting menu" press the button (2, fig. 14)
? for 3 seconds.
 Note
Note
When within this menu no other function can be displayed.
 Important
For safety reasons, the setting menu can only be accessed when motorcycle speed is lower than or equal to 20 km/h. If this menu is open and the speed of the motorcycle exceeds 20 km/h, the instrument panel automatically exits the menu and returns to the "main" display.
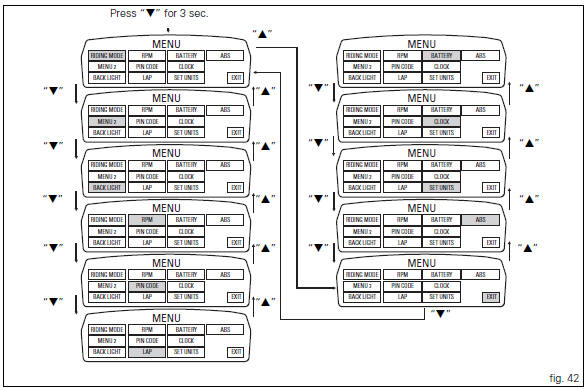
The setting menu contains the following "items":
- Riding mode
- Menu 2
- Back light
- Rpm
- Pin code
- Lap
- Battery
- Clock
- Set units
- Abs
- Exit
To quit the setting menu, use button (1, fig. 14) ?
 or
or
button (2, fig. 14) ? to select the
"exit" indication and
press the reset button (12, fig. 12).
 Instrument panel diagnosis
This function identifies any abnormal vehicle behaviours.
The instrument panel activates any abnormal vehicle
behaviours in real time (errors).
At key-on (at the end of the check) one or more & ...
 Riding mode customisation
This function customises each riding style.
To access the function it is necessary to view the "setting"
menu page 48, using button (1, fig. 14) ?
or (2, fig. 14)
? select the & ...
Other materials:
Stored lap display function
This function displays the stored laps.
To access the function it is necessary to view the "setting" menu page 48, using
button (1, fig. 14) ?"" or (2, fig.
14) ?" " select the "lap" function and
press the reset button
(12, fig. 12) To go to next pag ...
Indicator air - air temperature
This function shows the external temperature.
Display limits: -39C - +124C
In the event of a sensor fault (-40C, +125C or disconnected), a string of
dashes "- - -" (not flashing) is displayed and
the "vehicle/engine diagnosis - eobd" light comes on.
Note
When the vehicle is stopped, the ...
Adjusting of the air-gap phonic wheel sensor
(For front as well as rear sensor) in each case of maintenance that foresees:
Replacement or refitting of the wheel
Replacement or refitting of the phonic wheel (1) or (2)
Replacement or refitting of the brake discs
Replacement or refitting of the speed sensor (3) or (4)
(Front) replacem ...