
Ducati Diavel Service Manual: Abs disabling function
This function disables or enables the abs.
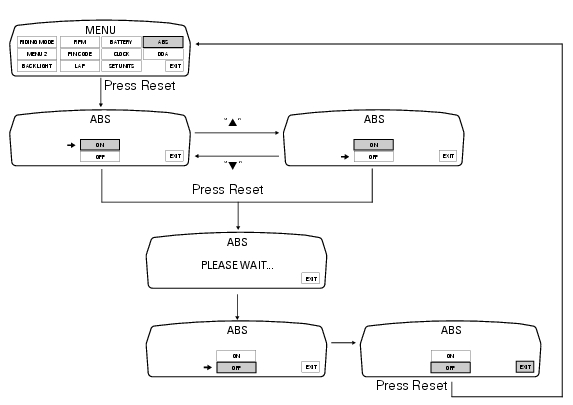
To access the function it is necessary to view the ""setting" menu", using buttons (1) "s" or (2) "t" to select the "abs" function and press the reset button (3) to enter the following page.
Function state is highlighted on the display (on in green or off in yellow); use button (1) "s" or (2) "t" to shift the arrow on the left onto the new setting and confirm by pressing the reset button (3) for 3 seconds.
After these 3 seconds the system checks whether the request was actually complied with; during the check the display will show the message "please wait…".
The new condition will be displayed after check time.
Note
If the disabling request was not met, it is recommended to repeat the procedure. If the problem persists, contact your ducati dealer or authorised service centre.
To exit the setting function, press the reset button (3) when "exit" is highlighted.
 Units of measurement modification function
This function allows you to change the units of measurement of the displayed
values.
To access the function it is necessary to view the ""setting" menu", using
buttons (1) "s" or (2) "t" to sel ...
 Immobilizer override procedure
This procedure makes it possible to "temporarily" turn on the motorcycle if
the hf (hands free) system is not working.
Note
The pin code function must be activated by entering your 4 digit pin in ...
Other materials:
Riding style function (riding style change)
This function changes the motorcycle riding style.
Each riding style is associated with a different intervention
level of the traction control (dtc - ducati traction control)
and different engine power and output.
To change the motorcycle riding mode, press the reset
button once (12, fig. 1 ...
Immobilizer override procedure
This procedure makes it possible to "temporarily" turn on
the motorcycle if the hf (hands free) system is not working.
Note
The pin code function must be activated by entering
your 4 digit pin in the instrument panel, otherwise the
vehicle cannot be turned on temporarily in the case ...
Removal of the engine
In order to remove engine you must first remove a series of other components
from the motorcycle.
Most of these removal procedures are described in the relative sections of this
manual.
The following flow chart illustrates the logical sequence in which the parts are
to be removed from th ...