
Ducati Diavel Service Manual: Cylinder/piston assemblies
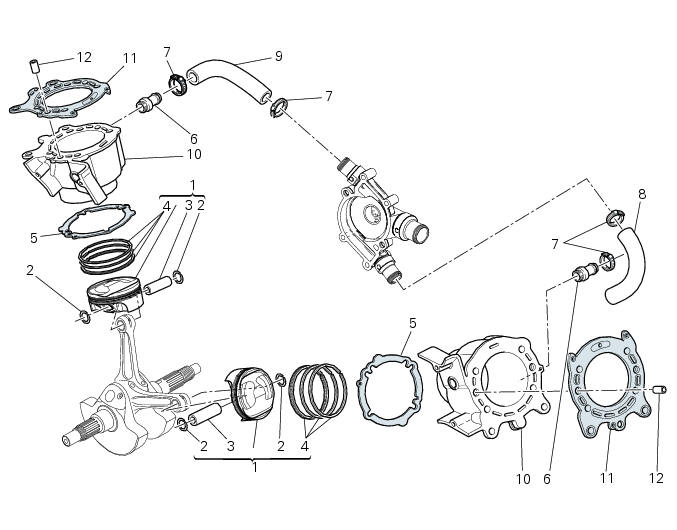
- Piston
- Gudgeon pin circlip
- Gudgeon pin
- Set of piston rings
- Cylinder-crankcase gasket
- Water pump outlet union
- Hose clip
- Horizontal cylinder coolant inlet hose
- Vertical cylinder coolant inlet hose
- Cylinder barrel
- Cylinder head gasket
- Bush
Spare parts catalogue
Diavel abs cylinders - pistons
Diavel carbon abs cylinders - pistons
Important
Bold reference numbers in this section identify parts not shown in the figures alongside the text, but which can be found in the exploded view diagram.
- Removal of the cylinder/piston assembly
- Overhaul of the cylinder barrel/piston components
- Refitting the cylinder/piston assembly
 Refitting the cylinder head assemblies
Warning
To prevent oil leaks past the contact area between cylinders and
crankcase, each time the head is removed, cylinder and
piston must be removed as well to clean the mating faces of crankcas ...
 Removal of the cylinder/piston assembly
Loosen the clamps (7) and remove the hoses (8) and (9) from the cylinder
barrels (10) and from the alternator-side
crankcase cover.
If damaged, unscrew the unions (6).
Note
T ...
Other materials:
Removal of the rear brake disc
Remove the rear eccentric hub (sec. 7 - 13, Removal of the rear wheel
eccentric hub and rear wheel shaft).
Undo and remove the four fixing screws (13) of the brake disk to the wheel axle
and remove the rear brake disk (14).
Loosen the four screws (24) and remove the rear phonic wheel (25). ...
Refitting the gear interlock plunger and pawl assembly
On the special screw (3), fit the gear pawl lever (4), orienting it as shown
in the figure, the washer (2) with the square
edge side (d) facing the clutch-side crankcase half, and the spring (1),
positioning it so that the hook end (a) is facing
the gear pawl lever. Locate the hook end (a) of ...
Starter motor
Power:
0.7 Kw/12 v
Direction of rotation:
counter clockwise viewed from power take-off side.
The starter motor is highly compact and reliable and therefore rarely gives
any type of problem. In case of troubles,
ensure that the starter motor cable terminal is properly tightened under the n ...