
Ducati Diavel Service Manual: Refitting the cylinder head assemblies
Warning
To prevent oil leaks past the contact area between cylinders and crankcase, each time the head is removed, cylinder and piston must be removed as well to clean the mating faces of crankcase and cylinder and restore the spoiled gaskets and o-rings and apply again liquid sealant (sect. 9 - 5, Refitting the cylinder/piston assembly).
Before fitting the head, check that the seal is fitted on the mating surface between head and cylinder (sect. 9 - 5, Refitting the cylinder/piston assembly).
Note
When fitting the gasket, side (e) with the stamped code must be in contact with the cylinder head.
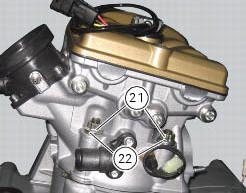
Lower the cylinder head carefully over the studs. Take care not to damage the threads.
Fit the special washers (22) and nuts (21) onto the cylinder head studs.
Tighten the nuts (21) on the stud bolts evenly and gradually in a crosswise pattern using tool 88713.2676 In conjunction with a torque wrench.
Temporary tighten the nuts (21) to a torque of 20 nm; pre-tightening to a torque of 40 nm (min. 38 Nm - max. 48 Nm); one tightening to a torque of 60 nm (min. 57 Nm - max. 63 Nm) (sect. 3 - 3, Engine torque settings).
 Reassembly of the cylinder head
The exhaust side can be identified by the three threaded holes on the flange.
The intake side can be identified by the presence of four threaded holes on
the flange.
All the photos in this ...
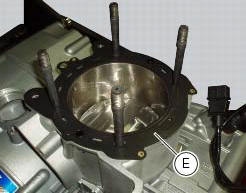
 Cylinder/piston assemblies
Piston
Gudgeon pin circlip
Gudgeon pin
Set of piston rings
Cylinder-crankcase gasket
Water pump outlet union
Hose clip
Horizontal cylinder coolant inlet hose
Vertical cylinder c ...
Other materials:
Adjusting the position of the gearchange and rear brake
pedals
The position of the gearchange and rear brake pedals in
relation to the footrests can be adjusted to suit the
requirements of the rider.
Adjust the pedals as follows:
Gear change pedal (fig. 97)
Hold the linkage (1) and slacken the lock nuts (2) and (3).
Note
Nut (2) has a left-hand thr ...
Refitting the cylinder heads pulleys/fixed tensioners
Check that the keyway on the end of the camshaft is in good condition and
without burrs.
Fit a woodruff key (b) in the keyway of each camshaft.
Fit the pulley (11) on the camshaft, inserting the woodruff key in the in the
slot (c) in the pulley.
Apply the recommended grease to the t ...
Water pump
Screw
Washer
Circlip
Water pump outlet union
Bearing
bearing
Spacer
Aluminium gasket
Mechanical seal
Water pump impeller
Bush
Water pump cover assembly
Screw
Plug
Sealing washer
Generator cover
Special washer
Fuel filler flange
Spare parts catalogue
Diave ...