
Ducati Diavel Owners Manual: Digital rpm indication function
This function displays the number of rpms for improved accuracy when setting idle rpm.
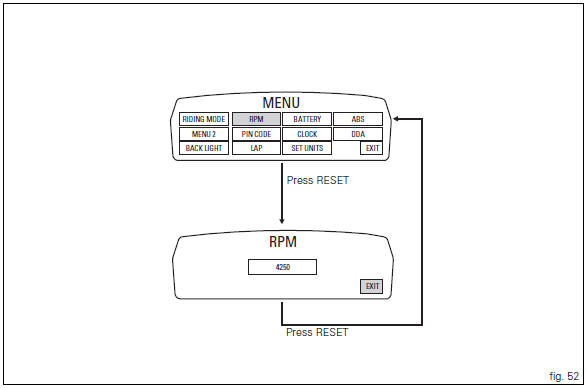
To access the function it is necessary to view the "setting" menu page 48, using
button (1, fig. 14) ?"
" or (2, fig. 14) ?" " select the "rpm" function and
press the reset button
(12, fig. 12) To confirm.
The display shows the numerical value of the rpm with a precision of 50 rpm.
To exit the setting function, press the reset button (12, fig.
12) Where "exit" is highlighted.
 Backlighting setting function for the instrument panel on Handlebar -
dashboard 2
Backlighting setting function for the instrument panel on Handlebar -
dashboard 2
This function allows backlighting setting of the instrument
panel on handlebar.
To access the function it is necessary to view the "setting" menu page 48, using
button (1, fig. 14) ?&q ...
 Lap activation/deactivation function (lap time)
This function activates and deactivates the lap function (lap
time).
To access the function it is necessary to view the "setting" menu page 48, using
button (1, fig. 14) ?"
&quo ...
Other materials:
Refitting the rear brake control
If the pushrod (18), clip (30) and fork (31) assembly has been dismantled,
reassemble it by screwing the nut (29) onto
the rod (18) and then screw the rod into the fork (31) to obtain the measurement
indicated in the figure.
Block the rod and tighten to a torque of 7.5 Nm +/- 10% (sect. 3 - ...
Using a multimeter to check the electrical systems
Introduction
This instrument allows you to measure resistance, voltages, and current
values. Multimeters can be divided into two basic
types: analogue and digital display multimeter. An analogue multimeter has a
pointer display. The dial is marked with the
scales to be used for measurement of ...
Refitting the expansion tank
If the support (15) has been removed, place the hose clamps (14) on the
bracket (15) orienting them as indicated.
Fully press the pins (a) to block the clamps (14) until pins surfaces (b) are at
the same level of the clamps (14) surfaces.
Apply recommended threadlocker to the thread of the ...