
Ducati Diavel Service Manual: Refitting the air filters
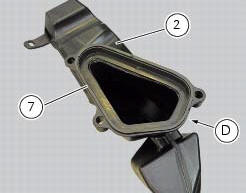
Apply universal sealant in the air duct (2) and (6) groove (d).
Fit seal (7) in the groove (d) having care to place it correctly in the relevant seat so as to avoid abnormal wrinkles.
Pull out the filter cartridge (1) from the seat in the airbox.

Position the rh air duct (2).
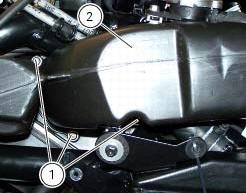
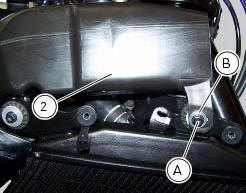
Start the screws (1) and the screw (a) with washer (b).
Tighten the screws (1) to a torque of 3.5 Nm +/- 10% (sect. 3 - 3Frame torque settings) and screw (b) to a torque of 10 nm +/- 10% (sect. 3 - 3, Frame torque settings).
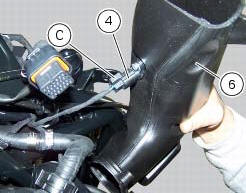
Proceed in the same way to refit the lh intake duct (5), and connect the connector (c) of the air temperature sensor (4).
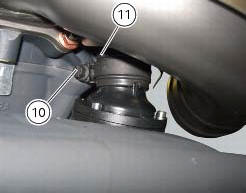
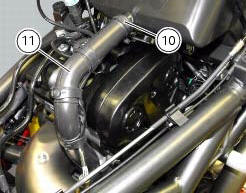
Check that the clips (10) securing hose (11) are positioned as shown.
 Removal of the air filters
Work on the vehicle right side, loosen screws (3) that secure the intake duct
(2) to the airbox, and the radiator retaining
screw (a); recover the washer (b).
Remove the intake duct (2).
...
 Exhaust system
Screw
Bush
Vibration damper mount
Silencer
Washer
Screw
Bracket
Nut
Nut
Upper heat guard
Screw
Washer
Central heat guard
Spacer
Clip nut
Long exhaust spring
Plug ...
Other materials:
Draining the clutch hydraulic circuit
Warning
Clutch fluid will damage painted surfaces if spilled on them. It is
also very harmful if it comes into contact with the skin or
with the eyes; in the case of accidental contact, wash the affected area
thoroughly with plenty of running water.
Remove the dust cap to expose the bleed val ...
Checking the camshafts and supports
Check the cam contact surfaces for scratches, grooves, steps and waving.
Worn cams are frequently the cause of poor timing, which leads to loss of engine
power.
Place the camshaft between two centres and check the run-out on the areas
indicated using two dial gauges.
Service limit: 0.1 ...
Specific tools for the frame
88713.1072 Drift to install half bearing in bottom yoke
88713.2562 Chain assembly tool
88713.1058 Wrench for steering shaft nut
88713.1062 Tool for installing steering head bearings
88713.2951 Rear wheel balancing tool
88713.3211 Wrench for adjustment of the eccentric hu ...