
Ducati Diavel Service Manual: Refitting the front mudguard
Warning
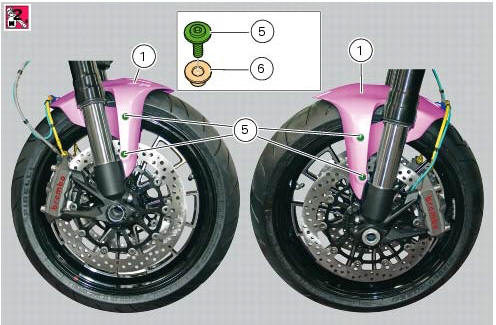
Do not use the motorcycle without the front mudguard fitted to avoid the risk of the brake pipes fouling the wheel on braking.
Insert the screws (5) in spacers (6) with recommended threadlocker, as shown in the figure.
Position the front mudguard (1) and start the special screws (5).
Tighten the screws (5) to a torque of 5 nm +/-10% (sect. 3 - 3, Frame torque settings).
Warning
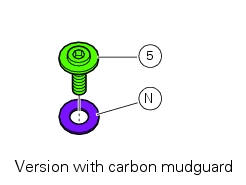
The version provided with carbon mudguards must feature nylon washers (n) instead of the spacers (6).
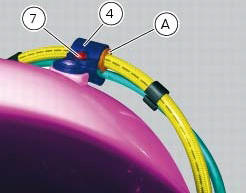
Place the hose grommet (a) of the front brake hose and the speed sensor cable inside clip (4) as shown in the figure.
Close the clip (4) and tighten the screw (7) to a torque of 0.35 Nm +/- 10% (sect. 3 - 3, Frame torque settings).
 Removal of the front mudguard
Undo the screw (7) and remove the front brake lines (a) from the hose grommet
(4).
Undo and remove the special retaining screws (5): keep the spacers (6).
Remove the front mudguard (1).
War ...
 Removing the rear mudguard
Undo the screws (9) and remove the rear mudguard (8) from the swingarm.
...
Other materials:
Indicator cons. Avg - average fuel consumption
This function indicates the "average" fuel consumption.
The calculation is made considering the quantity of fuel used and the km
travelled since the last trip 1 reset. When trip 1
is reset, the value is set to zero and the first available value is shown on the
display 10 seconds after the re ...
Electric system
Basic electric items are:
headlight:
low beam bulb type: 1xh7 blue vision (12v-55w);
high beam bulb type: 1xh1 (12v-55w);
parking light: led (12v-2.4W).
Electrical controls on handlebars.
Turn indicators:
front: led (13.5V-2.9W).
Horn.
Brake light switches.
Sealed battery, 12v-10 ...
Oil cooler
Oil cooler
Vibration damper mount
Spacer
Screw
Nipple
Aluminium gasket
Oil delivery hose
Screw
Plate
Bracket
Screw
Engine oil pressure sensor
Sealing washer
Heat guard
Exhaust protection
Screw
Washer
Spacer
Spare parts catalogue
Diavel abs oil cooler
Dia ...