
Ducati Diavel Service Manual: Removal of the front mudguard
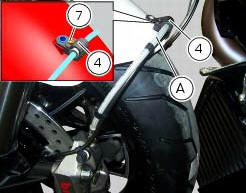
Undo the screw (7) and remove the front brake lines (a) from the hose grommet (4).
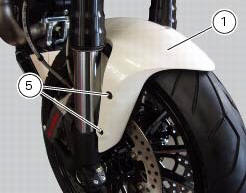
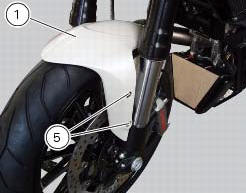
Undo and remove the special retaining screws (5): keep the spacers (6).
Remove the front mudguard (1).
Warning
The version provided with carbon mudguards features nylon washers instead of the spacers (6).
Note
On usa versions, a reflector is mounted on the front mudguard (1).
Note
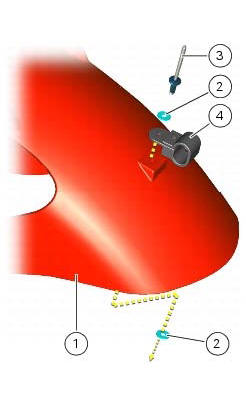
The hose grommet (4) is fastened to front mudguard (1) by means of a shear rivet (3) with two washers (2) in-between.
 Front and rear mudguard
Front mudguard
Washer
Rivet
Clip
Screw
Spacer
Screw
Rear mudguard
Screw
Spare parts catalogue
Diavel abs rear swingarm
Diavel abs belly fairing
Diavel carbon
abs
rear sw ...
 Refitting the front mudguard
Warning
Do not use the motorcycle without the front mudguard fitted to avoid
the risk of the brake pipes fouling the wheel on
braking.
Insert the screws (5) in spacers (6) with recommended thread ...
Other materials:
Background setting function for the dashboard on tank - dashboard 1
This function allows setting the "background" of the dashboard on tank.
To access the function it is necessary to view the ""setting" menu", using
buttons (1) "s" or (2) "t" select the "back
light" function and press the reset button (3) to enter the following page.
Use button (1) "s" or (2 ...
Engaged gear indicator
This function displays the gears (1, fig. 25).
The instrument panel receives information and indicates the
engaged gear or "n" for neutral.
Note
In the case of a gear sensor "error", a dash "-" (not
flashing) will be displayed.
...
Reassembling the frame and the lateral footrests
Apply the recommended grease to the thread of the pins (9) and of the nuts
(8).
Place the frame (1) and the brackets (2) and (3) on the engine block. Start the
pins (9) by holding the nuts (8) and insert
without tightening the screws (6) into the adjusters (4).
Position and fix the rear s ...