
Ducati Diavel Owners Manual: Abs disabling function
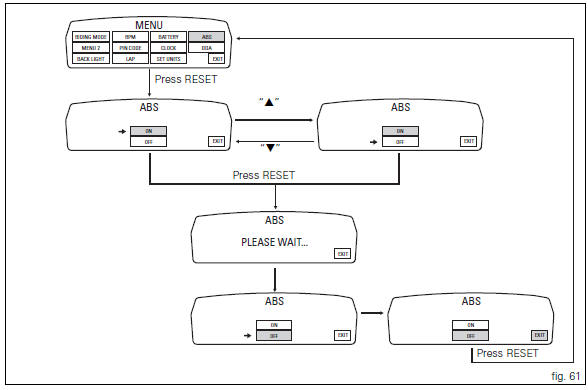
This function disables or enables the abs.
To access the function it is necessary to view the "setting" menu page 48, using
button (1, fig. 14) ?"
" or (2, fig. 14) ?" " select the "abs" function and
press the reset button
(12, fig. 12) To go to next page.
Function state is highlighted on the display (on in green or off in yellow); use
button (1, fig. 14) ?"
" or (2, fig. 14) ?" "
"
to shift the arrow on the left onto the new setting and
confirm by pressing the reset button (12, fig. 12) For 3
seconds.
After these 3 seconds the system checks whether the request was actually complied with; during the check the display will show the message "please wait...".
The new condition will be displayed after check time.
 Note
Note
If the disabling request was not met, it is recommended to repeat the procedure. If the problem persists, contact your ducati dealer or authorised service centre.
To exit the setting function, press the reset button (12, fig.
12) Where "exit" is highlighted.
 Units of measurement modification function
This function allows you to change the units of measurement
of the displayed values.
To access the function it is necessary to view the "setting" menu page 48, using
button (1, fig. 14 ...
 The immobilizer system
For additional antitheft protection, the motorcycle is
equipped with an immobilizer, an electronic system that
locks the engine automatically whenever the ignition switch
is turned off.
The grip ...
Other materials:
Refitting the radiator
The reassembly procedure is the same for both radiators.
Check for the nuts with clips (8).
Refit the rh radiator (13) on the frame and tighten the screws (4) and (5)
with the spacers (6) to a torque of 10 nm
+/-10% (sect. 3 - 3, Frame torque settings).
Connect the connections of ...
Engine setting function (engine power control)
This function customises engine power and output.
To access the function it is necessary to view the ""setting" menu", using
buttons (1) "s" or (2) "t" select the "riding
mode" function and press the reset button (3) to enter the following page.
Use button (1) "s" or (2) "t" to select the r ...
Refitting the front mudguard
Warning
Do not use the motorcycle without the front mudguard fitted to avoid
the risk of the brake pipes fouling the wheel on
braking.
Insert the screws (5) in spacers (6) with recommended threadlocker, as shown
in the figure.
Position the front mudguard (1) and start the special screws (5 ...