
Ducati Diavel Owners Manual: Units of measurement modification function
This function allows you to change the units of measurement of the displayed values.
To access the function it is necessary to view the "setting" menu page 48, using
button (1, fig. 14) ?" " or (2, fig.
14) ?" " select the "set units" function
and press the reset
button (12, fig. 12) To go to next page.
Use button (1, fig. 14) ?" " or (2,
fig. 14) ?" " to select the
value relative to the unit of measurement to be changed and
press the reset button again (12, fig. 12).
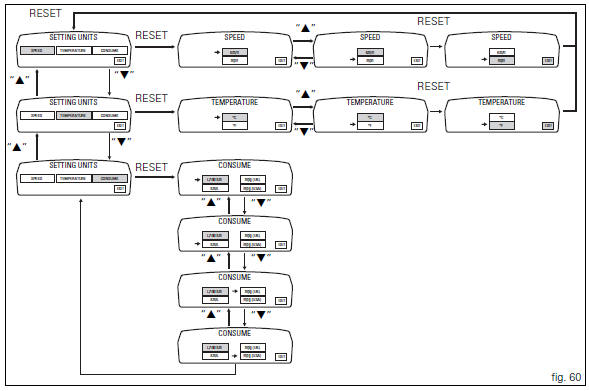
The instrument panel displays the values that can be modified; use button (1,
fig. 14) ?" " or (2, fig. 14) ?"
 " to
" to
select the value to modify and press the reset button (12, fig.
12) Again.
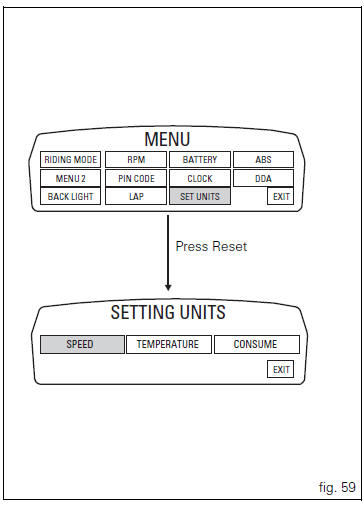
"Speed" setting
This function allows to change the units of measurement of speed (and hence even the ones of distance travelled).
Currently set unit of measurement is highlighted in green on the display; use
button (1, fig. 14) ?" " or (2, fig.
14) ?" " to
" to
shift the arrow on the left onto the new setting and confirm
by pressing the reset button (12, fig. 12).
Save the setting and, when coming back to main screen, any new unit of measurement set will be present.
- Km/h: by setting this condition the following values will have the same units of measurement:
- Tot, trip1, trip2, trip fuel: km
- Vehicle speed and average speed (speed avg): km/h
- Mph: by setting this condition the following values will have the same units of measurement:
- Tot, trip1, trip2, trip fuel: miles
- Vehicle speed and average speed (speed avg): mph.
To exit the setting function, press the reset button (12, fig.
12) Where "exit" is highlighted.
"Temperature" setting
This function allows you to change the units of measurement of the temperature.
Currently set unit of measurement is highlighted in green on the display; use
button (1, fig. 14) ?" " or (2, fig.
14) ?" " to
" to
shift the arrow on the left onto the new setting and confirm
by pressing the reset button (12, fig. 12).
Save the setting and, when coming back to main screen, any new unit of measurement set will be present
- C: by setting this condition the following values will have the same units of measurement:
- Engine coolant temperature and t_air: C
- F: by setting this condition the following values will have the same units of measurement:
- Engine coolant temperature and t_air: f
To exit the setting function, press the reset button (12, fig.
12) Where "exit" is highlighted.
Consume setting
This function allows to change the units of measurement of the average and instantaneous fuel consumption.
Currently set unit of measurement is highlighted in green on the display; use
button (1, fig. 14) ?"
" or (2, fig. 14) ?" " to
" to
shift the arrow on the left onto the new setting and confirm
by pressing the reset button (12, fig. 12).
Save the setting and, when coming back to main screen, any new unit of measurement set will be present.
- Km/l: by setting this condition the following values will have the same units of measurement:
- Cons. And cons. Avg: km/l
- L/100: by setting this condition the following values will have the same units of measurement:
- Cons. And cons. Avg: l/100
- Uk mpg: by setting this condition the following values will have the same units of measurement:
- Cons. And cons. Avg: uk mpg
- Usa mpg: by setting this condition the following values will have the same units of measurement:
- Cons. And cons. Avg: usa mpg
To exit the setting function, press the reset button (12, fig.
12) Where "exit" is highlighted.
 Clock setting function
This function sets the clock.
To access the function it is necessary to view the "setting" menu page 48, using
button (1, fig. 14) ?"
"or (2, fig. 14) ?""select th ...
 Abs disabling function
This function disables or enables the abs.
To access the function it is necessary to view the "setting" menu page 48, using
button (1, fig. 14) ?"
" or (2, fig. 14) ?"& ...
Other materials:
Reassembly of the clutch-side crankcase cover
Fit the plug (14) and the gasket (13). Fit the plug (17) and the gasket (15).
If the bush has been replaced, fully seat the new bush (7) in the slot in the
cover using a suitable drift and a press.
If the sealing ring (8) needs to be renewed, fit the new seal into the crankcase
cover, po ...
Abs fault indicator not working
Fault codes
Dds: displays a fault code described in the description of the abs system.
Dashboard: no fault code displayed.
Wiring diagram
Checks
The abs fault indicator indicates the occurrence of one or more faults in the
antilock brake system, or if the system itself
has been disable ...
Dds diagnosis instrument
The main functions of the dds diagnosis instrument can be summarised as
follows:
Retrieval of errors (faults) of the ignition-injection system stored in
the engine control unit memory and their subsequent
deletion, if required.
Reading of engine parameters (rpm, coolant and air temperat ...