
Ducati Diavel Owners Manual: Adjusting the front fork
The front fork used on this motorcycle has rebound, compression and spring preload adjustment.
The settings are adjusted using external adjuster screws.
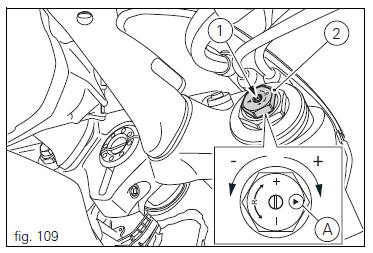
- To adjust rebound damping (fig. 109);
- To adjust spring preload (fig. 109);
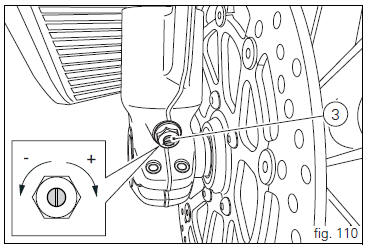
- To adjust compression damping (fig. 110).
Park the motorcycle in a stable position on its side stand.
Turn the adjuster (1) on fork leg top with a flat screwdriver to adjust rebound damping.
Turn the adjuster (3) on fork leg bottom with a flat screwdriver to adjust compression damping.
Turn the adjusting screws (1 and 3) to adjust the dampening.
Turn the screw all the way in to set the hardest damping (position "0"). Starting from this position, turning anticlockwise, you can count the turns.
To change preload of the spring inside each fork leg, turn the hex. Adjuster (2, fig. 109) With a 22 mm hexagon wrench, starting from the fully open position (clockwise). From reference (a, fig. 109), Every full turn clockwise corresponds to 1 mm of preload of the spring, up to a maximum of 15 mm, corresponding to 3 full turns.
Standard settings, from fully open position, are as follows: compression: 1 and a half turns; rebound: 1 and a half turns.
Spring preload: fully open (anticlockwise).
 Important
Adjust both fork legs to same settings.
 Passenger grabhandle
Passenger grabhandle (1, fig. 107) Is located inside the tail
guard; to take it out, remove the seat (see "removal of the
seat" on page 119), pull the knob (2, fig. 107) While taking out
...
 Adjusting the rear shock absorber
The rear shock absorber has external commands that enable
you to adjust the setting to suit the load on the motorcycle.
The adjuster (1, fig. 111) Located on the lower connection
holding the shoc ...
Other materials:
Engine speed-timing sensor
Introduction
The engine control system of the diavel is equipped with an inductive sensor
that allows the ecu to determine the speed
and timing phase of the engine. The sensor faces a phonic wheel with 48 teeth
minus 2.
The engine speed-timing sensor is an inductive sensor and faces a 48 ...
Checks and adjustments
Closing shim
Intake side camshaft
Opening shim
Exhaust side camshaft
Valve
Spare parts catalogue
Diavel abs cylinder head: timing system
Diavel abs vertical cylinder head
Diavel abs horizontal cylinder head
Diavel carbon
abs
cylinder head: timing system
Diavel carbon
abs
v ...
Overhauling the rear wheel
Inspect the condition of the rear wheel.
As the wheel rim has no bearings, it should be supported using the service tool
code 88713.2951.
Note
This service tool can also be used to install the wheel on a balancing
machine.
Overhauling the wheel
Inspect the wheel as described below.
...