
Ducati Diavel Service Manual: Valves - rocker arms
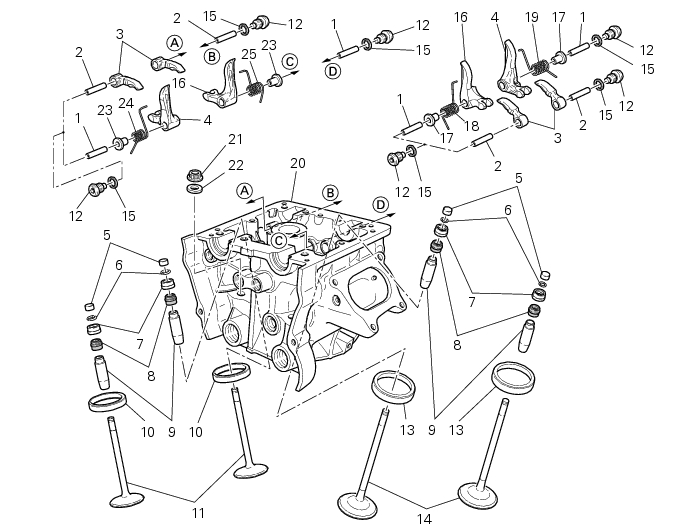
- Closing rocker arm shaft
- Opening rocker arm shaft
- Opening rocker arm
- Closing rocker arm (left)
- Valve opening shim
- Half rings
- Valve closing shim
- Sealing ring
- Valve guide
- Exhaust valve seat
- Exhaust valve
- Plug
- Intake valve seat
- Intake valve
- Aluminium gasket
- Closing rocker arm (right)
- Spacer
- Valve return spring (right)
- Valve return spring (left)
- Head
- Cylinder head nut
- Washer
- Spacer
- Valve return spring (right)
- Valve return spring (left)
Spare parts catalogue
Diavel abs crankcase halves
Diavel abs vertical cylinder head
Diavel abs horizontal cylinder head
Diavel carbon abs crankcase halves
Diavel carbon abs vertical cylinder head
Diavel carbon abs horizontal cylinder head
Important
Bold reference numbers in this section identify parts not shown in the figures alongside the text, but which can be found in the exploded view diagram.
- Removal of the cylinder heads
- Removing the valves
- Removing the valve rocker arms
- Overhaul of cylinder head components
- Reassembly of the cylinder head
- Refitting the cylinder head assemblies
 Refitting the intake manifold and coolant union
Apply prescribed threadlocker to the fitting (12), start it with seal (24)
and tighten it to a torque of 2.5 Nm (min. 2 Nm -
max. 3 Nm) (sect. 3 - 3, Frame torque settings).
Install the pipe (b) ...
 Removal of the cylinder heads
Using the tool code 88713.2676, Undo the nuts (21) on the cylinder head stud
bolts.
Remove the cylinder head nuts (21) and special washers (22).
Remove the cylinder head assembly by lift ...
Other materials:
Wiring diagram colour codes
B blue
Bk black
Bn brown
G green
Gr grey
Lb light blue
O orange
P pink
R red
V violet
W white
Y yellow
Rear left fuse box (1) key
Rear right fuse box (2) key
...
Fault indication
The dds (diagnosis ducati system) indicates all active errors and all
inactive but stored errors gathered by the bbs. A
simplified summary of the active errors is also shown in the master dashboard
service display when the dashboard is
switched on. Simultaneously, the eobd warning light is als ...
Timing system
Desmodromic (type) with four valves per cylinder,
operated by eight rocker arms (4 opening rockers and 4
closing rockers) and two overhead camshafts. It is operated
by the crankshaft through spur gears, belt rollers and toothed
belts.
Desmodromic timing system (fig. 159)
Opening (or upp ...