
Ducati Diavel Service Manual: Refitting the brake disks
Before refitting the brake disc to the wheel, clean all contact surfaces thoroughly and smear a medium strength threadlocker on the threads of retaining screws (5).
Operating on the left side, fit the phonic wheel (6).
Tighten the fixing screws (5) of the brake disk (7) to the wheel following this sequence: 1-3-5-2-4.
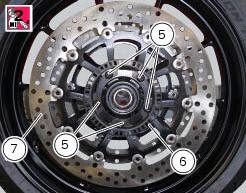
Tighten the screws (5) to the torque of 25 nm +/- 5% (sect. 3 - 3, Frame torque settings).
Refit the wheel on the motorcycle (sect. 7 - 1, Refitting the front wheel).
 Overhauling the front brake components
Important
Critical safety components. The brake calliper manufacturer recommends
that you do not attempt to service the internal
components of the brake callipers. Incorrect overhaul of this compo ...
 Refitting the front brake system
While refitting the system, pay special attention to the orientation of the
pipe couplings (24) on the pump and the pipes
(13) and (20) on the callipers (9) and (18).
Warning
If incorrectly posit ...
Other materials:
Refitting the front brake master cylinder
Insert the front brake master cylinder unit (1) on the right side of the
handlebar to bring the terminal internal edge in
correspondence to the bolted joints (a).
Fit the terminal (12) on the handlebar inserting the screws (15).
Tighten the terminal (12) retaining screws to a torque of 10 ...
Residual range indication when the service is due
After resetting the first oil service warning (triggered at 1000 km), upon
every key-on the system displays the
indication of which type of service should be performed next (oil service or
desmo service) and the residual range.
A (green) warning (1) is activated for 2 seconds on every key-on ...
Removal of the clutch master cylinder assembly
Warning
The clutch master cylinder manufacturer advises against servicing of
the clutch master cylinder (1) due to the safetycritical
nature of this component. Incorrect overhaul of this component could endanger
rider safety.
Maintenance operations of the master cylinder are limited to replac ...