
Ducati Diavel Owners Manual: Adjusting throttle control free play
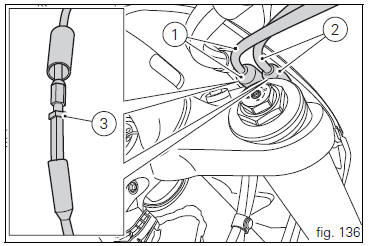
The throttle twistgrip must have free play of 1.5×2.0 Mm in all steering positions, measured on the outer edge of the twistgrip. If necessary, adjust it using the adjusters (1 and 2, fig. 135) Located on the headstock on the right-hand side of the vehicle.
Adjuster (1) is for throttle opening, and adjuster (2) is for throttle closing.
Slip the rubber gaiters off the adjusters and loosen the counter nuts (3). Adjust both adjusters by the same amount: turn clockwise to increase free play and anticlockwise to reduce free play. When finished, tighten the counter nuts (3) and refit the rubber gaiters to the adjusters.

 Lubricating cables and joints
Check the outer sheath of the throttle control and cold start
lever cables for damage at regular intervals. The outer plastic
cover should not be flattened or cracked. Operate the
controls to make ...
 Charging the battery
Before charging the battery, it is recommended to remove it
from the motorcycle.
Important
The battery is housed in the cowling, always contact
a ducati dealer or an authorised service centre for ...
Other materials:
Stored lap display function
This function displays the stored laps.
To access the function it is necessary to view the ""setting" menu", using
buttons (1) "s" or (2) "t" select the "lap"
function and press the reset button (3) to enter the following page.
Use button (1) "s" or (2) "t" to select "lap data" indication a ...
Indicator speed avg - average speed
This function shows the average speed of the motorcycle.
The calculation is made considering the distance and time travelled since the
last trip 1 reset. When trip 1 is reset, the
value is set to zero and the first available value is shown on the display 10
seconds after the reset. Dashes "- ...
Ground connection locations
The negative cable, which is normally connected to the negative pole of the
battery, is fastened to the crankcase. From here, the cable
branches off and splits up within the electrical system to carry the ground
connection to the different elements in the system.
The image shows the ground ...