
Ducati Diavel Service Manual: Background setting function for the dashboard on tank - dashboard 1
This function allows setting the "background" of the dashboard on tank.
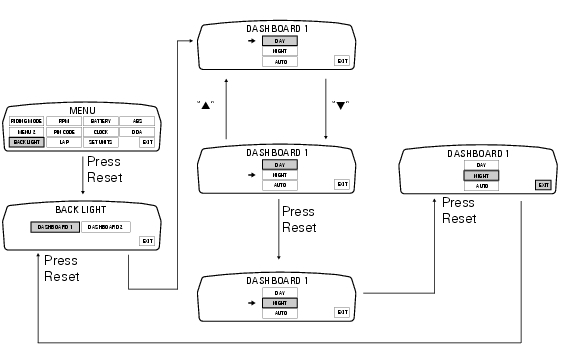
To access the function it is necessary to view the ""setting" menu", using buttons (1) "s" or (2) "t" select the "back light" function and press the reset button (3) to enter the following page.
Use button (1) "s" or (2) "t" to select the "dashboard 1" function and confirm by pressing the reset button (3).
Once you enter the "dashboard 1" function, setting is highlighted on the display (day, night or auto in green); use button (1) "s" or (2) "t" to shift the arrow to the left onto the new setting and confirm by pressing the reset button (3).
To exit the setting function, press the reset button (3) when "exit" is highlighted.
"Day" setting: dashboard background becomes permanently "white" to improve readout view - recommended with bright exterior lighting.
"Night" setting: dashboard background becomes permanently "black" for a more dimmed visibility - recommended with poor exterior lighting and/or dark.
"Auto" setting: dashboard background is set automatically according to exterior lighting conditions (detected by a sensor) and will be "black" for a more dimmed visibility with poor exterior lighting and "white" for an improved readout view with bright exterior lighting.
Note
In the event of an interruption of the power supply from the battery, when power is restored at the next key-on, the backlighting will always be set by default to "auto" mode.
 Menu 2 on/off function
This function turns off and back on the menu 2.
If menu 2 is disabled, the functions for average fuel consumption (cons.Avg),
instantaneous fuel consumption (cons.),
Average speed (speed avg), t ...
 Backlighting setting function for the dashboard on handlebar - dashboard 2
This function allows backlighting setting of the dashboard on handlebar.
To access the function it is necessary to view the ""setting" menu", using
buttons (1) "s" or (2) "t" select the "back
li ...
Other materials:
Introduction to the engine control system
The engine control system used on the diavel consists of the following
elements:
Ride-by-wire system (motorised throttle valves with electric actuator,
throttle grip position sensor and throttle valve
position sensor)
One injector per cylinder installed downstream of throttle valve
On ...
Communication antenna
Introduction
The communication antenna enables the hands free system to detect and
communicate with the active or passive key.
The active key is detectable within a range of 1.5 Metres, whereas the passive
key (or active key with flat battery) can
only be detected if placed in contact with ...
Disassembly of the rear brake control
The brake master cylinder is supplied only as a complete unit; internal
components cannot be replaced.
To disassemble the master cylinder's outer parts, follow the indications given
in the exploded view at the beginning of this
section.
If the bush (10) inside the brake pedal (6) needs to ...