
Ducati Diavel Owners Manual: Lap registration function
This function describes the "lap" time registration.
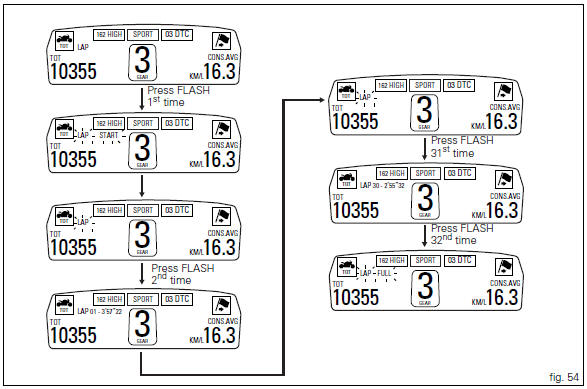
If the function is activated (see "lap activation/deactivation description), the lap time can be registered as follows:
- Pressing the flash headlight button (11, fig. 12) The first time starts the "lap timer" for the first lap, and the instrument panel shows the message "lap-start" flashing for 4 seconds, and then returns to the previous display;
- From this moment, each time that the flash is pressed (11, fig. 12) The display automatically shows the lap number and lap time for 10 seconds and then returns to the "previous" display.
You can save a maximum of 30 laps in the memory.
Once the memory is full, the instrument panel no longer stores lap times when the flash headlight button (11, fig. 12) Is pressed, and the flashing message "lap-full" is shown on the display for 4 seconds until the times are reset.
When the lap function is set disabled, the current "lap" is not stored.
If the lap function is active and suddenly the motorcycle is suddenly turned off (key-off), the function will be automatically disabled (even if the lap timer was active, the current "lap" is not stored).
If the time is never "stopped", it will roll over upon reaching 9 minutes, 59 seconds and 99 hundredths; the lap timer starts counting from 0 (zero) and will keep running until the function is disabled.
If however the lap function is switched on and the memory has not been cleared, but fewer than 30 laps have been saved (e.G. 18 Laps), the instrument panel will store any remaining laps until the memory is full (in this case, it will store an additional 12 laps).
This function only displays the times for the lap being registered; but other data are also saved (max speed and max rpm) for viewing at a later date in the "lap data" function (stored lap display).
 Lap activation/deactivation function (lap time)
This function activates and deactivates the lap function (lap
time).
To access the function it is necessary to view the "setting" menu page 48, using
button (1, fig. 14) ?"
&quo ...
 Stored lap display function
This function displays the stored laps.
To access the function it is necessary to view the "setting" menu page 48, using
button (1, fig. 14) ?"" or (2, fig.
14) ?" &quo ...
Other materials:
Checking engine oil level
Check the engine oil level through the sight glass (1) on the
clutch cover. When checking oil level, the motorcycle should
be perfectly upright and the engine cold. The oil level should
be between the two marks next to the sight glass. If level is
low, top up with shell advance ultra 4 engine oi ...
Removal of the rear brake calliper
Important
The brake manufacturer advises against any servicing of the internal
components of brake callipers or the master cylinder.
Incorrect overhaul of these critical safety components can endanger rider and
passenger safety.
Before removing the parts in question, you must first carry ou ...
Checking valve lift
Set the engine to the configuration described for the "checking and adjusting
the valve clearances", previously indicated.
Position the tool 88765.1518 On the cylinder head: the part marked "a" should be
on the intake side and the part
marked "s" should be on the exhaust side.
Seat the pl ...