
Ducati Diavel Owners Manual: Stored lap display function
This function displays the stored laps.
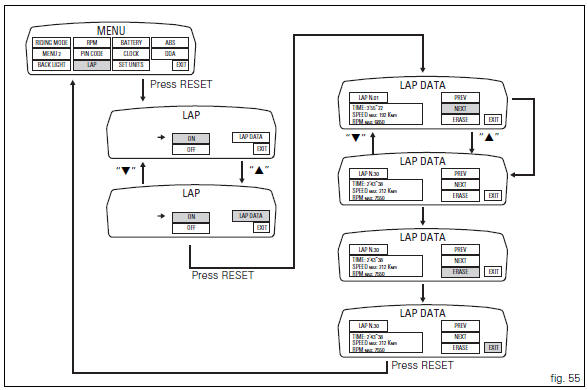
To access the function it is necessary to view the "setting" menu page 48, using
button (1, fig. 14) ?" " or (2, fig.
14) ?" " select the "lap" function and
press the reset button
(12, fig. 12) To go to next page.
Use button (1, fig. 14) ?" " or (2,
fig. 14) ?" " to select "lap
data" indication and press the reset button again (12, fig.
12) To enter the page showing the previously recorded lap times.
The instrument panel displays the information as follows:
- At top left, the number of the displayed lap (ex.: Lap n.01);
- At bottom left, a rectangle inside which is the lap time (time), top speed in that lap (speed max) and top rpm in the same lap (rpm max);
- On the right, use button (1, fig. 14) ?"
 "
"
or (2, fig. 14) ?" "
"
to select "next" (so that every time the reset button is pressed (12, fig. 12) The next lap is displayed) or "prev" (so that every time the reset button is pressed (12, fig.12) The previous lap is displayed).
To exit, select "exit" and press the reset button (12, fig. 12).
 Note
Note
The max stored speed is indicated on the display (increased by 5%).
If no lap times are saved in memory, "no lap" indication is displayed and lap timer will indicate "-.- -.- -", Max rpm will be = - - - - - - and max speed = - - - - -.
 Note
Note
If the stored times are deleted while the lap function is active, it will be automatically deactivated.
 Lap registration function
This function describes the "lap" time registration.
If the function is activated (see "lap activation/deactivation
description), the lap time can be registered as follows:
Pres ...
 Stored lap erase function
This function erases the stored laps.
To access the function it is necessary to view the "setting" menu page 48, using
button (1, fig. 14) ?"" or (2, fig.
14) ?"" ...
Other materials:
Specific operating strategies
Idle speed
No electric motor is used for idle speed regulation (bypass is modulated
instead with the throttle valve), as idle speed
control is effected by the ride-by-wire system. Idle speed is maintained by the
control unit when the speed drops below a
specific threshold and when the clutch ...
Water pump
Screw
Washer
Circlip
Water pump outlet union
Bearing
bearing
Spacer
Aluminium gasket
Mechanical seal
Water pump impeller
Bush
Water pump cover assembly
Screw
Plug
Sealing washer
Generator cover
Special washer
Fuel filler flange
Spare parts catalogue
Diave ...
High beam lights not working
Fault codes
The hi beam light on the (slave) dashboard flashes at 1hz frequency.
Wiring diagram
Location of elements on motorcycle
(A) injection relay; (b) etv relay (throttle valve operating engine); (c)
radiator fan relay; (d) hands free relay.
Fuses located at the rear left of the ...