
Ducati Diavel Service Manual: Refitting the rear suspension
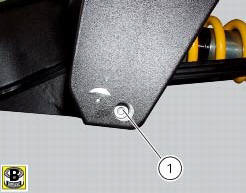
Lubricate the thread and underside of the special screw (1).
Insert the lower side of the shock absorber into the swingarm and insert the screw (1).
Tighten the screw (1) to a torque of 45 nm +/- 5% (sect. 3 - 3, Frame torque settings).
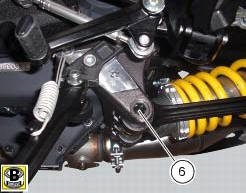
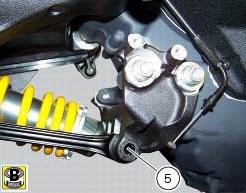
Lubricate bushes (5) and (6) with recommended grease.
Position the upper part of the shock absorber assembly on the supporting plate and fit bush (6) on the lh side of the vehicle, and bush (5) on the right side.
Tighten the bush (5) to a torque of 45 nm +/- 10% (sect. 3- 3, Frame torque settings) while holding the bush (6).
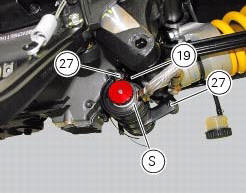
Refit the tank assembly (s) of the shock absorber on support (19) and tighten the screws (27) to a torque of 10 nm +/- 10% (sect. 3 - 3, Frame torque settings).
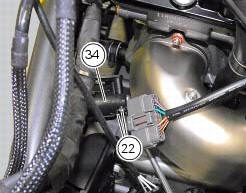
Reposition the assembly (34) on the frame and tighten the screws (22) to a torque of 10 nm +/- 10% (sect. 3 - 3, Frame torque settings).

 Reassembly of rear shock absorber - rocker arm - linkage assembly
Once the needle roller bearings (9) have been removed from the rocker arm
(18), upon reassembly fit a new needle roller
bearing (9) on drift part no. 88713.1071 And lubricate with recommended greas ...
 Removal of the shock absorber support
Remove the rear brake master cylinder (sect. 7 - 4, Removing of the rear
brake control).
Remove the rear shock absorber (see removal of the rear shock absorber of this
section).
Loosen the s ...
Other materials:
Stored lap erase function
This function erases the stored laps.
To access the function it is necessary to view the "setting" menu page 48, using
button (1, fig. 14) ?"" or (2, fig.
14) ?"" select the "lap" function and
press the reset button
(12, fig. 12) To go to next page.
...
Draining the clutch hydraulic circuit
Warning
Clutch fluid will damage painted surfaces if spilled on them. It is
also very harmful if it comes into contact with the skin or
with the eyes; in the case of accidental contact, wash the affected area
thoroughly with plenty of running water.
Remove the dust cap to expose the bleed val ...
Using a multimeter to check the electrical systems
Introduction
This instrument allows you to measure resistance, voltages, and current
values. Multimeters can be divided into two basic
types: analogue and digital display multimeter. An analogue multimeter has a
pointer display. The dial is marked with the
scales to be used for measurement of ...