
Ducati Diavel Service Manual: Refitting the seat
Note
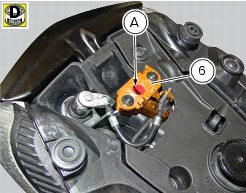
Apply recommended grease to the hole (a) of latch (6).
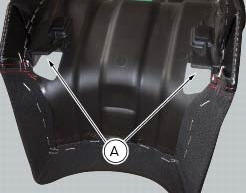
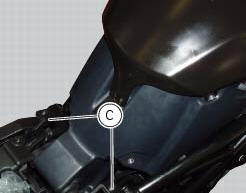
Fit the seat (1) as follows: insert the tabs (b) (on the front side) under the rubber pads (c) of the gloves compartment; then push the seat rear side until hearing the lock latch click.
 Reassembly of the seat
Place the seat cover (2) on the seat and fix it (on the lower side) by
starting screws (4) on plates (5).
Tighten the screws (4) to a torque of 4 nm +/- 10% (sect. 3 - 3, Frame torque
settings) ...
 Front and rear mudguard
Front mudguard
Washer
Rivet
Clip
Screw
Spacer
Screw
Rear mudguard
Screw
Spare parts catalogue
Diavel abs rear swingarm
Diavel abs belly fairing
Diavel carbon
abs
rear sw ...
Other materials:
How to turn the motorcycle off
To turn the motorcycle off, turn the switch from "run on" to "run off". The
engine stops. To switch the dashboard off,
push the on/off switch downwards. When released, the switch automatically
returns to the "run off" position.
Push the switch downwards to switch the engine off and enter " ...
Refitting the radiator
The reassembly procedure is the same for both radiators.
Check for the nuts with clips (8).
Refit the rh radiator (13) on the frame and tighten the screws (4) and (5)
with the spacers (6) to a torque of 10 nm
+/-10% (sect. 3 - 3, Frame torque settings).
Connect the connections of ...
Replacing the battery in the active key
Only use 3 volt cr 2032 lithium ion batteries.
Note
The keys do not need to be reprogrammed after
replacing the battery.
Remove the metal part of the battery.
Use a large sized coin to pry open the shells of the plastic grip
(2? coin) as shown in fig. 65.
Important
Insert the coil on ...