
Ducati Diavel Service Manual: Front and rear mudguard
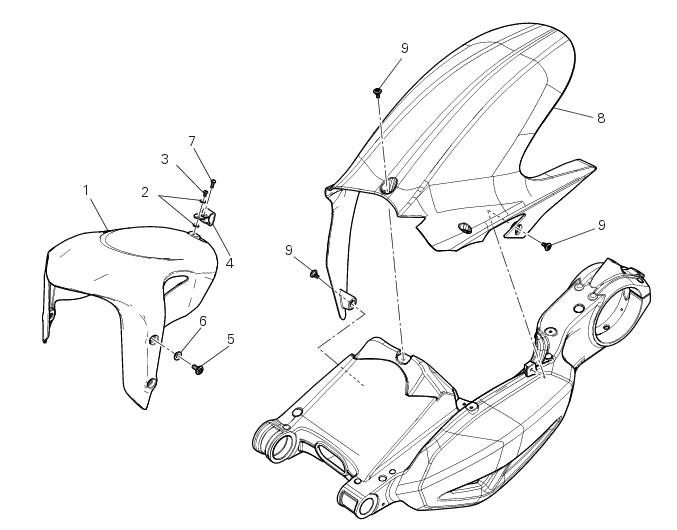
- Front mudguard
- Washer
- Rivet
- Clip
- Screw
- Spacer
- Screw
- Rear mudguard
- Screw
Spare parts catalogue
Diavel abs rear swingarm
Diavel abs belly fairing
Diavel carbon abs rear swingarm
Diavel carbon abs belly fairing
Important
Bold reference numbers in this section identify parts not shown in the figures alongside the text, but which can be found in the exploded view diagram.
- Removal of the front mudguard
- Refitting the front mudguard
- Removing the rear mudguard
- Refitting the rear mudguard
 Refitting the seat
Note
Apply recommended grease to the hole (a) of latch (6).
Fit the seat (1) as follows: insert the tabs (b) (on the front side) under
the rubber pads (c) of the gloves compartment;
then push ...
 Removal of the front mudguard
Undo the screw (7) and remove the front brake lines (a) from the hose grommet
(4).
Undo and remove the special retaining screws (5): keep the spacers (6).
Remove the front mudguard (1).
War ...
Other materials:
Dashboard diagnosis
This function identifies any abnormal vehicle behaviours.
The dashboard activates any abnormal vehicle behaviours in real time (errors).
At key-on (at the end of the check) one or more "errors" are displayed in red
(only if they are active).
When an "error" is triggered, the indication (r ...
Removal of the exhaust system
Remove the silencer, as described in the paragraph "removing the silencer" of
this section.
Loosen the screws (28) and remove the exhaust by-pass valve cover (27).
Turn the exhaust valve pulley (a) to facilitate the throttle cable (25)
output.
Release the end fitting (b) of the cable ...
Indicator cons. Avg - average fuel consumption
This function indicates the "average" fuel consumption.
The calculation is made considering the quantity of fuel used and
the km travelled since the last trip 1 reset. When trip 1 is reset,
the value is set to zero and the first available value is shown on
the display 10 seconds afte ...