
Ducati Diavel Service Manual: Removal of the water pump

Note
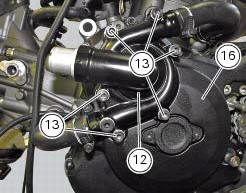
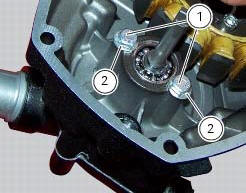
For clarity, the figures show the engine removed from the frame.
Loosen and remove the water pump cover (12) fixing screws (13) to the generator cover (16).
Remove the water pump cover (12).
Clean the pump housing of any scale. Check the bearings wear by turning the impeller shaft (10); in case of excessive clearance, it is necessary to replace them by operating as follows.
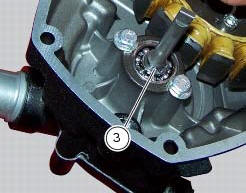
Remove the circlip (3) on the impeller shaft.
Slide off the rotor (10) with the sealing ring (9) from the outside.

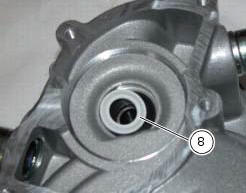
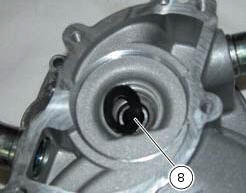
Recover the ceramic washer - seal unit (8) placed on the internal side.
Undo and remove the screws (1) with the washer (2).
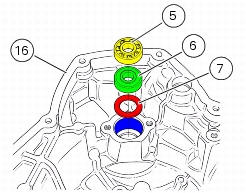
Working from the generator cover (16) internal side, use a suitable punch to press on the inner race of end bearing (5) until it can be extracted from the cover.
Use the same technique to remove the other bearing (6).
Remove the inner spacer (7).
Check the condition of the components of the mechanical seal: there should be no signs of deformation, cracking, or excessive wear. In the case of damage, both components must be renewed.
 Water pump
Screw
Washer
Circlip
Water pump outlet union
Bearing
bearing
Spacer
Aluminium gasket
Mechanical seal
Water pump impeller
Bush
Water pump cover assembly
Screw
Plug
Se ...
 Refitting the water pump
Clean the seat on the cover, any parts you intend to reuse, and the impeller
shaft. Then refit as follows.
Fit on the impeller (10) shaft the mechanical seal (9) as indicated in the
figure.
...
Other materials:
Overhauling the front brake components
Important
Critical safety components. The brake calliper manufacturer recommends
that you do not attempt to service the internal
components of the brake callipers. Incorrect overhaul of this component could
endanger rider safety.
Operations should be limited to renewal of the pads, fasteners ...
Rear-view mirrors
Rear-view mirror
Screw
U-bolt
Spring washer
Spare parts catalogue
Diavel abs handlebar and controls
Diavel carbon
abs
handlebar and controls
Important
Bold reference numbers in this section identify parts not shown in the
figures alongside the text, but which can be found in
...
Removal of the brake discs
The front brake discs consist of an inner carrier, which is mounted to the
wheel, and an outer rotor. Both parts must be
changed together as a pair.
Remove the front wheel (sect. 7 - 1, Removal of the front wheel).
Undo the retaining screws (5) of the disc to the wheel, remove the disc (7) ...