
Ducati Diavel Service Manual: Residual range indication when the service is due
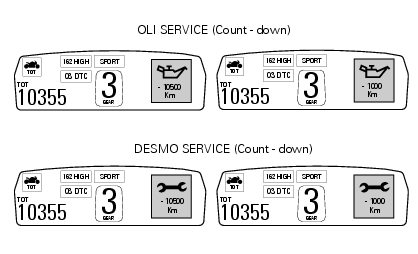
After resetting the first oil service warning (triggered at 1000 km), upon every key-on the system displays the indication of which type of service should be performed next (oil service or desmo service) and the residual range.
A (green) warning (1) is activated for 2 seconds on every key-on; while 1000 km before the threshold an (amber yellow) warning (2) is activated for 5 seconds upon every key-on.
 First warning - oil service 1000 km
The first warning is activated at 1000 km (600 miles) of odometer reading.
The (red) warning is activated as a large icon for 10 seconds upon every key-on
(1) then as a small warning that
remain ...
 Indication of range reached for service
When service coupon threshold is achieved, upon every key-on the system
displays the indication of the type of
intervention that is required (oil service or desmo service).
The (red) warning is ...
Other materials:
Refitting the gear selector lever
Position the gearbox drum selector fork in the centre of the gear rollers.
Position the gear selector lever (21) together with control shaft, spring and
plate into the chain-side crankcase half.
Insert the screws (18) and (20) with the spacer (19).
Temporarily fit gear change lever (or a ...
Overhaul of the crankcase halves
Carefully examine the engine crankcase halves.
Check that the surfaces of the crankcase halves are perfectly flat using a
reference surface.
Check that the bearings (1) and (18), and the bushings (2) and (17) are in
optimum conditions. Note that the main
bearings must always be changed in p ...
Belly fairing
Rh belly fairing
Lh belly fairing
Special screw
Nylon washer
Screw
Central belly fairing
Oil cooler shield
Special screw
Clip
Washer
Clip
Screw
Bracket
Screw
Spare parts catalogue
Diavel abs belly fairing
Diavel carbon
abs
belly fairing
Important
Bold refere ...