
Ducati Diavel Service Manual: Footrest brackets
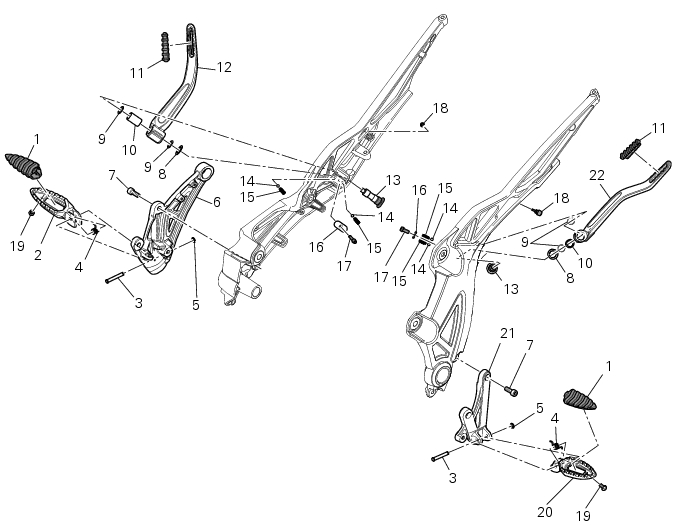
- Rubber footrest
- Right front footrest
- Pin
- Spring
- Circlip
- Right footrest bracket
- Screw
- Washer
- O-ring
- Bush
- Rubber pad
- Right rear footrest
- Pin
- Ball
- Spring
- Plate
- Screw
- Vibration damper mount
- Special screw
- Front lh footrest
- Left footrest bracket
- Left rear footrest
Spare parts catalogue
Diavel abs r.H. Footrests
Diavel abs l.H. Footrests
Diavel carbon abs r.H. Footrests
Diavel carbon abs l.H. Footrests
Important
Bold reference numbers in this section identify parts not shown in the figures alongside the text, but which can be found in the exploded view diagram.
- Removal of the front footrests
- Refitting the front footrests
- Removing the front footrest brackets
- Reassembling the front footrest brackets
- Reassembling the front footrest brackets
- Removing of the rear footrests
- Refitting the rear footrests
 Lubricating the chain
O-ring chains have sealed, life-lubed link studs and bushes. However, these
chains need lubricating at regular intervals to
protect metal parts of the chain and the o-rings.
Lubrication also ser ...
 Removal of the front footrests
Note
The removal of the front footrests is described only for the right one (2)
but it is the same also for the left one.
Remove the circlip (5) by releasing the pin (3).
Slide the pin (3) off ...
Other materials:
Removal of the throttle twistgrip
Peel back the rubber sleeve (a) protecting the throttle control cables.
Undo the screws (b) of the throttle grip (6) and open the command.
Disconnect the throttle grip cables (10) by unhooking the cable ends (c) from
their seats.
Remove the throttle twistgrip (6) from the handlebar.
...
Alternator
It is equipped with a 12 v, 430 w generator, consisting of a fixed element
(stator, a) located on the generator cover and
of a movable element (rotor, b) fixed to the crankshaft.
Note
To check the battery charging system for faults, use the dds diagnosis
instrument and follow the instruct ...
Disassembly of rear shock absorber - rocker arm - linkage assembly
Undo the screw (15) and remove the rear shock absorber (11) from the rocker
arm (18).
Undo
Undo the screw (14) and the nut (21) and remove the linkages (10) and (12)
from the rocker arm (18).
The rocker arm movement is obtained by needle roller bearings (9) rotating on
a spacer (1 ...