
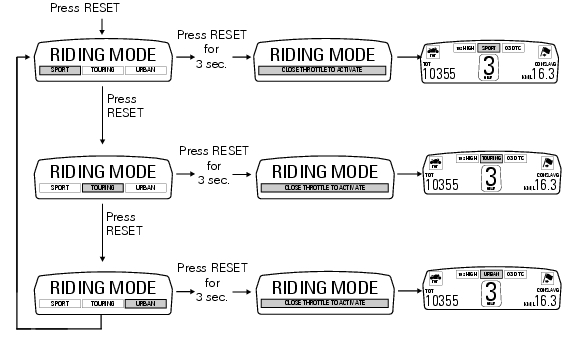
Ducati Diavel Service Manual: Riding style function (riding style change)
This function changes the motorcycle riding style.
Each riding style is associated with a different intervention level of the traction control (dtc - ducati traction control) and different engine power and output.
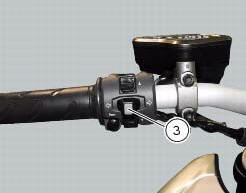
To change the motorcycle riding mode, press the reset button once (3) and the "riding mode" menu will appear on the display.
Select the desired riding mode by pressing the reset button (3) repeatedly. Press the same button for 3 seconds to confirm the riding style.
If the twistgrip is closed (vehicle stopped) the riding style change will occur immediately; if the twistgrip grip is open (vehicle moving) the message "close throttle to activate" will appear on the display, which means that the throttle must be closed; this message will appear for 5 seconds, during which the gas must be closed in order to activate the new riding style.
If the twistgrip is not closed after 5 seconds, the procedure is aborted (no change is made).
If the "riding mode" menu is activated and the reset button (3) is not kept pressed for 10 seconds, the dashboard will automatically exit the display mode without making any change.
Warning
Ducati recommends changing the riding style when the vehicle is stopped. If the riding style is changed while riding, be very careful (it is recommended to change the riding style at a low speed).
 Indication if the lap function is active/not active
This function indicates if "lap" function (lap number) is active.
When "lap" is not lit up, this means that the function has been switched off.
The "lap" function can be activated using the "lap ...
 Maintenance indicator
This function indicates that the vehicle is about to or has travelled a
distance for which an authorised ducati service
centre should be contacted to have the general maintenance or oil change
pe ...
Other materials:
Exhaust by-pass valve not working correctly
Fault codes
Dds: exvl diagnosis -> position error, potentiometer, short circuit to ground
or open circuit (s.C. Gnd or c.O.),
Potentiometer short circuited to vdc (potentiometer s.C vdc).
Dashboard: the error "exvl" (exhaust bypass valve) is shown on the service
display. The eobd warning ...
Oxygen sensors
Introduction
An on-off type oxygen sensor (in normal operating conditions, the voltage
generated by the sensors switches between a
value close to 1v and a value close to 0v) is mounted on each of the exhaust
manifold of the diavel.
Each oxygen sensor has its own internal heater, which recei ...
High beam lights not working
Fault codes
The hi beam light on the (slave) dashboard flashes at 1hz frequency.
Wiring diagram
Location of elements on motorcycle
(A) injection relay; (b) etv relay (throttle valve operating engine); (c)
radiator fan relay; (d) hands free relay.
Fuses located at the rear left of the ...