
Ducati Diavel Owners Manual: Running-in recommendations
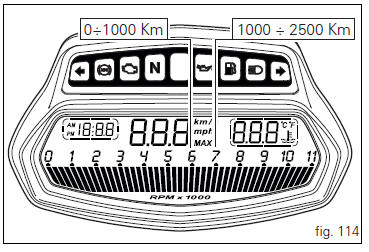
Maximum rpm (fig. 114)
Rotation speed for running-in period and during standard use (rpm)
- Up to 1000 km;
- From 1000 to 2500 km.
Up to 1000 km
During the first 1000 km, keep an eye on the rev counter.
It should never exceed 5500÷6000 rpm.
During the first hours of riding, it is advisable to run the engine at varying load and rpm, though still within recommended limit.
To this end, roads with plenty of bends and even slightly hilly areas are ideal for a most efficient running-in of engine, brakes and suspension.
For the first 100 km use the brakes gently. Avoid sudden or prolonged braking. This will allow the friction material on the brake pads to bed in against the brake discs.
To allow all the mechanical moving parts in the motorcycle to adapt to one another, and to avoid shortening the life of the main engine components, it is advisable to avoid sudden acceleration and running the engine at high rpm for too long, especially uphill.
Furthermore, the drive chain should be inspected frequently.
Lubricate as required.
From 1000 to 2500 km
At this point, you can squeeze some more power out of your engine. However never exceed 7000 rpm.
 Important
Throughout the running-in period, be careful to stick to the recommended maintenance schedule and periodic service intervals indicated in the warranty booklet. Failure to follow these instructions releases ducati motor holding s.P.A. From any liability whatsoever for any engine damage or shorter engine life
Strict observance of running-in recommendations will ensure longer engine life and reduce the likelihood of overhauls and tune-ups.

 Pre-ride checks
Warning
failure to carry out these checks before riding, may
lead to motorcycle damage and injury to rider and passenger.
Before riding, perform a thorough check-up on your bike as
follows:
Fuel ...
Other materials:
Gear indicator display on dashboard shows dashes, engaged gear not displayed
correctly, idle speed irregular
with gearbox in neutral
Fault codes
Dds: gear sensor diagnosis -> short circuit to ground or open circuit (s.C.
Gnd or c.O.) - Short circuit to vdc (s.C. Vdc)
- congruence (generic error - signal not correct).
Dashboard: the error "gear sensor" is shown on the service display. The eobd
warning light activates.
...
Distance travelled on fuel reserve: trip fuel
This function shows the distance travelled on fuel reserve (in km or miles
depending on the specific application).
When the fuel light comes on, the display automatically switches to the "trip
fuel" indicator.
Trip fuel reading remains stored even after key-off until the vehicle is
refue ...
Removing the front footrest brackets
Note
The assembly of the front footrests is described only for the right one
(2) but it is the same also for the left one.
Place the spring (4) bringing the end (a) onto the footrest (2).
Place the footrest (2) in the correct position, by inserting the end (c) of the
spring (4) in the hole ...