
Ducati Diavel Service Manual: Solenoid starter

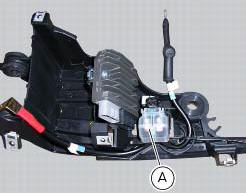
Remove the protection cover (a).
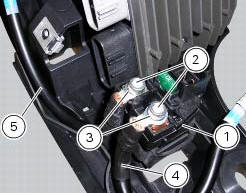
Undo the screws (2), taking care to collect the spring washers (3).
Remove the starter motor-solenoid cable (4) and the solenoid-battery cable (5).
Remove the starter solenoid (1) sliding it upwards.
Checking operation of the starter solenoid
To check the solenoid starter proceed as indicated in sect. 6 - 8, "Starter motor relay".
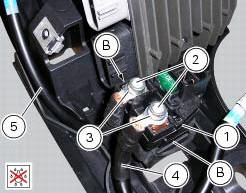
Ensure that the terminals are not oxidised.
Position the solenoid-starter motor cable (4) and the solenoid-battery cable (5) on the solenoid terminals.
Start the screws (2) fitting the spring washers (3).
Tighten the screws (2) to a torque of 4 nm +/- 10% (sect. 3 - 3, Frame torque settings).
Apply waterproof spray in the area of the screws.
Fix the starter solenoid (1) to the battery support inserting it in the tongues (b).
Refit the protection cover (a) inserting it on the solenoid starter guides until it engages with the tabs on both sides of the solenoid starter.


 Starter motor
Power:
0.7 Kw/12 v
Direction of rotation:
counter clockwise viewed from power take-off side.
The starter motor is highly compact and reliable and therefore rarely gives
any type of problem. ...

Other materials:
Routine maintenance record
...
Running lights not working
Fault codes
Dds: no fault code displayed.
Dashboard: no fault code displayed.
Location of connections and components
(A) low / high beam and parking light connections
rear running light and stop light connection.
Pin numbering of wiring harness side bbs unit connection.
Checks
The ...
Tester power supply
The dds (1) part number 97900.0215 Can be powered from the vehicle as
follows:
From the mains power supply: by connecting the power supply connector
(n) to the network power supply (2) part no.
97900.0224;
From the motorcycle: connecting the corresponding cables (see paragraph
...