
Ducati Diavel Owners Manual: Setting menu
This menu is used to enable/disable and set some motorcycle functions.
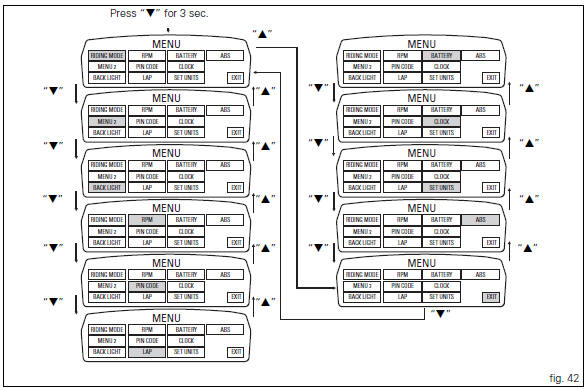
To access the "setting menu" press the button (2, fig. 14)
? for 3 seconds.
 Note
Note
When within this menu no other function can be displayed.
 Important
For safety reasons, the setting menu can only be accessed when motorcycle speed is lower than or equal to 20 km/h. If this menu is open and the speed of the motorcycle exceeds 20 km/h, the instrument panel automatically exits the menu and returns to the "main" display.
The setting menu contains the following "items":
- Riding mode
- Menu 2
- Back light
- Rpm
- Pin code
- Lap
- Battery
- Clock
- Set units
- Abs
- Exit
To quit the setting menu, use button (1, fig. 14) ?
 or
or
button (2, fig. 14) ? to select the
"exit" indication and
press the reset button (12, fig. 12).
 Instrument panel diagnosis
This function identifies any abnormal vehicle behaviours.
The instrument panel activates any abnormal vehicle
behaviours in real time (errors).
At key-on (at the end of the check) one or more & ...
 Riding mode customisation
This function customises each riding style.
To access the function it is necessary to view the "setting"
menu page 48, using button (1, fig. 14) ?
or (2, fig. 14)
? select the & ...
Other materials:
Guided diagnosis
Note
The on-screen icons used during this procedure are explained in a table at
the end of this section.
The dds diagnosis instrument guides the operator step-by-step through the
various diagnostic procedures,
providing descriptions and documentation for motorcycle components, wiring
diagra ...
Refitting the engine
Refitting is the reverse of removal.
Important
Apply recommended grease and tighten the special screws (6) to a torque of
60 nm +/- 5% (sect. 3 - 3, Frame torque
settings).
Tighten the nuts (3) to a torque of 48 nm +/- 5% (sect. 3 - 3, Frame torque
settings).
Warning
For the assembly seque ...
Refitting the cooling system hoses and unions
Position the pump/radiator sleeve (22) and the radiator/radiator sleeve (23).
Fit sleeve (23) and sleeve (22) to their corresponding fittings (n) and (o), and
bring them fully home on collars (p).
Note
Sleeves (23) and (22) must be oriented so that the grooves (q) match the
tabs (r) on fitt ...