
Ducati Diavel Owners Manual: Stored lap erase function
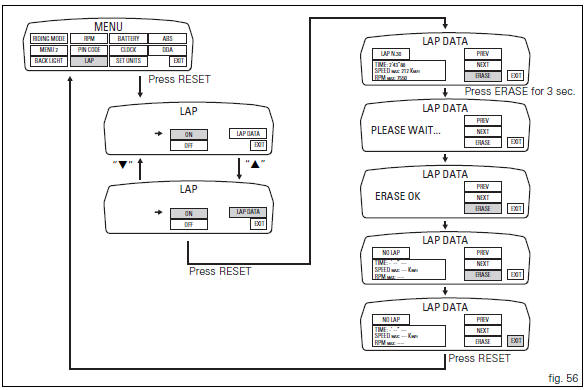
This function erases the stored laps.
To access the function it is necessary to view the "setting" menu page 48, using
button (1, fig. 14) ?" " or (2, fig.
14) ?" " select the "lap" function and
press the reset button
(12, fig. 12) To go to next page.
Use button (1, fig. 14) ?" " or (2,
fig. 14) ?" " to select "lap
data" indication and press the reset button again (12, fig.
12) To enter the page showing the previously recorded lap times.
Highlight the "erase" item, use button (1, fig. 14) ?" "
"
or (2, fig. 14) ?" " to scroll through
the stored laps to erase and
press the reset button (12, fig. 12) For 3 seconds. Now, on
the left-hand side of the display you have "please wait..."
and then, to confirm deletion, "erase ok" appears for 2
seconds.
You will notice that no stored data will be present any more and "no lap" message will be displayed.
To exit, select "exit" and press the reset button (12, fig. 12).
 Stored lap display function
This function displays the stored laps.
To access the function it is necessary to view the "setting" menu page 48, using
button (1, fig. 14) ?"" or (2, fig.
14) ?" &quo ...
 Battery voltage indicator (battery)
This function describes the battery voltage indicator.
To access the function it is necessary to view the "setting" menu page 48, using
button (1, fig. 14) ?"" or (2, fig.
1 ...
Other materials:
Wiring diagram of the hands free system
The diagram illustrates the inputs, outputs and communication lines used by
the hands free system.
1I - on/off button placed on the hands free system (located below the plastic
cover)
2I - on/off button placed on the bike handlebar rh side
3I - steering position micro-switch
4I - steerin ...
Warranty
In your own interest, and in order to guarantee product
reliability, you are strongly advised to refer to a ducati dealer
or authorised service centre for servicing that requires any
particular technical expertise.
Our highly skilled staff have the tools required to perform any
servicing job ...
"Parking" function
This function activates the "parkin"h mode.
The "parkin"h function activates the front and rear parking
lights when the vehicle is turned off so it is visible when
parked.
The function is activated by pressing the button (2, fig. 14)
?"´" for 3 seconds du ...