
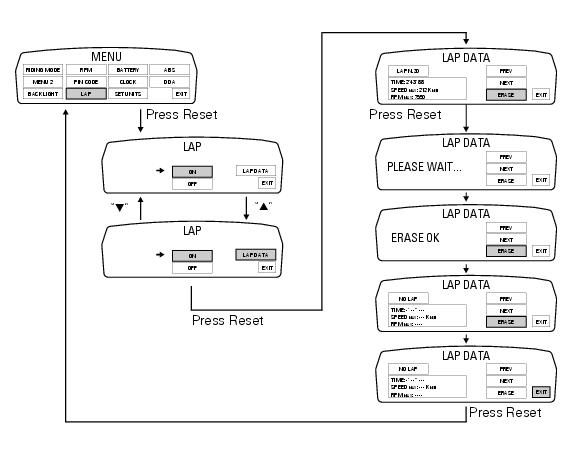
Ducati Diavel Service Manual: Stored lap erase function
This function erases the stored laps.
To access the function it is necessary to view the "setting" menu", using buttons (1) "s" or (2) "t" select the "lap" function and press the reset button (3) to enter the following page.
Use button (1) "s" or (2) "t" to select "lap data" indication and press the reset button again (3) to enter the page showing the previously recorded lap times.
Highlight the "erase" item, use button (1) "s" or (2) "t" to scroll through the stored laps to erase and press the reset button (3) for 3 seconds. Now, on the left-hand side of the display you have "please wait…" and then, to confirm deletion, "erase ok" appears for 2 seconds.
You will notice that no stored data will be present any more and "no lap" message will be displayed.
To exit, select "exit" and press the reset button (3).
 Stored lap display function
This function displays the stored laps.
To access the function it is necessary to view the ""setting" menu", using
buttons (1) "s" or (2) "t" select the "lap"
function and press the reset button ...
 Battery voltage indicator (battery)
This function describes the battery voltage indicator.
To access the function it is necessary to view the ""setting" menu", using
buttons (1) "s" or (2) "t" select the "battery"
function and pre ...
Other materials:
Flywheel - alternator
Screw
Alternator stator
Plug
Sealing ring
O-ring
Cover
Screw
Aluminium gasket
Screw
Bracket
Locating bush
Screw
generator cover
Flange
Flanged nut
Plane washer
Flywheel
Washer
Inner ring
Needle roller bearing
Electric starter driven gear
Starter clutc ...
Removal of the exhaust system
Remove the silencer, as described in the paragraph "removing the silencer" of
this section.
Loosen the screws (28) and remove the exhaust by-pass valve cover (27).
Turn the exhaust valve pulley (a) to facilitate the throttle cable (25)
output.
Release the end fitting (b) of the cable ...
Disassembly of rear shock absorber - rocker arm - linkage assembly
Undo the screw (15) and remove the rear shock absorber (11) from the rocker
arm (18).
Undo
Undo the screw (14) and the nut (21) and remove the linkages (10) and (12)
from the rocker arm (18).
The rocker arm movement is obtained by needle roller bearings (9) rotating on
a spacer (1 ...