
Ducati Diavel Service Manual: Stored lap display function
This function displays the stored laps.
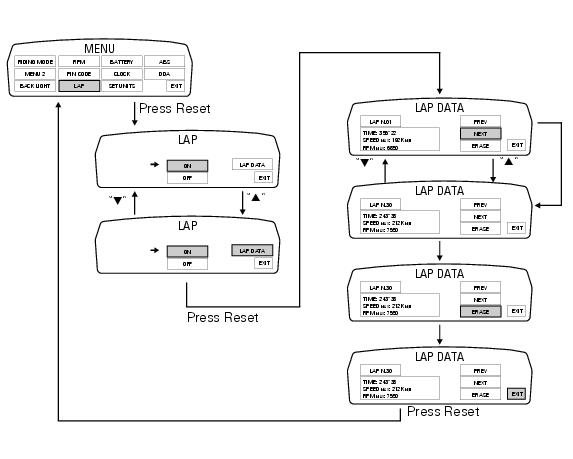
To access the function it is necessary to view the ""setting" menu", using buttons (1) "s" or (2) "t" select the "lap" function and press the reset button (3) to enter the following page.
Use button (1) "s" or (2) "t" to select "lap data" indication and press the reset button again (3) to enter the page showing the previously recorded lap times.
The dashboard displays the information as follows: at top left, the number of the displayed lap (ex.: Lap n.01); At bottom left, a rectangle inside which is the lap time (time), top speed in that lap (speed max) and top rpm in the same lap (rpm max); on the right, use button (1) "s" or (2) "t" to select "next" (so that every time the reset button is pressed (3) the next lap is displayed) or "prev" (so that every time the reset button is pressed (3) the previous lap is displayed); to exit, select "exit" and press the reset button (3).
Note
The max stored speed is indicated on the display (increased by 5%).
If no lap times are saved in memory, "no lap" indication is displayed and lap timer will indicate "-.- -.- -", Max rpm will be = - - - - - - and max speed = - - - - -.
Note
If the stored times are deleted while the lap function is active, it will be automatically deactivated.
 Lap registration function
This function describes the "lap" time registration.
If the function is activated (see "lap activation/deactivation description), the
lap time can be registered as follows:
pressing the flash he ...
 Stored lap erase function
This function erases the stored laps.
To access the function it is necessary to view the "setting" menu", using
buttons (1) "s" or (2) "t" select the "lap"
function and press the reset button (3 ...
Other materials:
Lap activation/deactivation function (lap time)
This function activates and deactivates the lap function (lap
time).
To access the function it is necessary to view the "setting" menu page 48, using
button (1, fig. 14) ?"
" or (2, fig. 14) ?" " select the "lap" function and
press the reset button
...
Indicator trip time - trip time
This function shows the vehicle trip time.
The calculation is made considering the time travelled since
the last trip 1 reset. When trip 1 is reset, the value is set to
zero.
The active phase calculation occurs when the engine is
running and the vehicle is stopped (when the vehicle is not
...
Backlighting setting function for the dashboard on handlebar - dashboard 2
This function allows backlighting setting of the dashboard on handlebar.
To access the function it is necessary to view the ""setting" menu", using
buttons (1) "s" or (2) "t" select the "back
light" function and press the reset button (3) to enter the following page.
Use button (1) "s" or ( ...