
Ducati Diavel Service Manual: Warning indication (alarms/signals)
The dashboard activates in real-time some warnings / malfunction that are not dangerous for the correct operation of the vehicle.
At key-on (at the end of the check) one or more "warnings" are displayed if they are active.
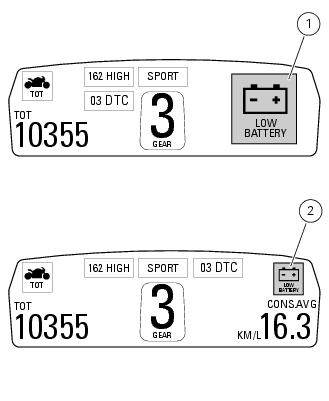
When a "warning" is triggered, the indication (amber yellow) remains well visible (1) for 10 seconds then becomes smaller (2).
If there are multiple indicators, they will scroll automatically every 3 seconds.
Note
No signal lights turn on if one or more "warnings" are activated.
The following "warnings" could be displayed: "low" battery level (low battery); traction control "deactivated" (dtc off); hands free key (hf) "not recognised"; "low" hands free key (hf) battery level; "high" engine coolant temperature (high temp); steering release error - steering still locked (unlock error).
With one or more "warnings" active, the user may access other functions by pushing button (2) "t".
 Indication of range reached for service
When service coupon threshold is achieved, upon every key-on the system
displays the indication of the type of
intervention that is required (oil service or desmo service).
The (red) warning is ...
 Low battery level
The activation of this (amber yellow) "warning" indicates that the status of
the battery vehicle is low.
It is activated when the battery voltage is ¼ 11.0 Volt.
Note
In this case, ducati ...
Other materials:
Reassembly of the front half-fairings
Fit the clips (2) on the front rh half-fairing (1).
Join the rh support (4) and the front rh half-fairing (1) and keep them in
position by starting the screws (5).
Note
To mount the rh support (4) in a proper way, it is necessary to insert the
tab (g) of the front rh half-fairing (1) in t ...
Removing outer components
Note
The following removal operations are required in order to renew and/or
clean the crankcase halves. If the original
crankcase halves are to be reused, then the removal of these components is not
essential.
Unscrew the screw (17) and remove the oil breather valve (1) with the o-rings
...
Backlighting setting function for the instrument panel on Handlebar -
dashboard 2
This function allows backlighting setting of the instrument
panel on handlebar.
To access the function it is necessary to view the "setting" menu page 48, using
button (1, fig. 14) ?"
" or (2, fig. 14) ?" " select the "back light" function
and press ...