
Ducati Diavel Service Manual: Changing and cleaning the air filters
The air filter must be replaced at the intervals described in the "scheduled maintenance chart" (sect. 4 - 2).
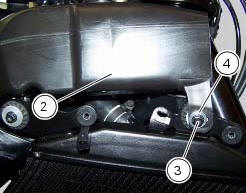
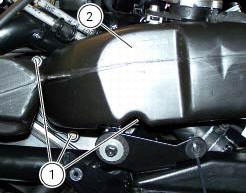
Work on the vehicle right side, loosen screws (1) that secure the intake duct (2) to the filter box, and the radiator retaining screw (3); recover the washer (4).
Remove the intake duct (2).

Pull out the filter cartridge (5) from the seat in the airbox.
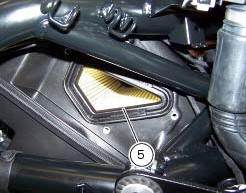
The filter cartridge can be cleaned with a jet of compressed air or replace if necessary.
Important
A clogged air filter will reduce air intake and engine power, increase fuel consumption and cause a build up of deposits on the spark plugs. Do not use the motorcycle without a filter as impurities in the air could get into the engine and cause damage.
Properly refit the cartridge in the filter box housing.
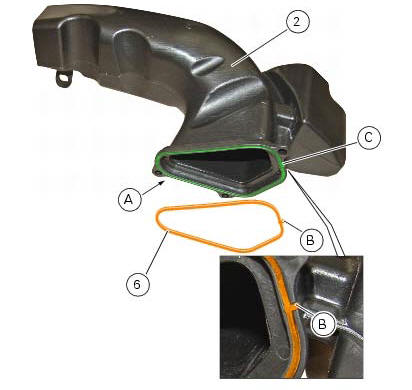
If the gasket (6) has been replaced, refit the new gasket in the proper seat (a) of the conveyor (2); place it so that the Tab (b) of the gasket (6) matches with slot (c) of the rh conveyor (2) as shown in the figure.
Note
Check for no abnormal wrinkles during gasket fitting.
Start the screws (1) and screw (3) with washer (4).
Tighten the screws (1) to a torque of 3.5 Nm +/- 10% (sect. 3 - 3Frame torque settings) and screw (3) to a torque of 10 nm +/-10% (sect. 3 - 3, Frame torque settings).

Important
If the motorcycle is used in very damp or dusty conditions, the air filter cartridge must be changed more frequently.
Check the air filter in the horizontal timing belt cover.
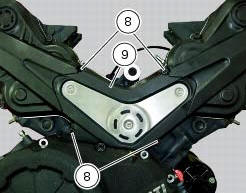
Loosen the screws (8) securing the central external cover (9) and remove it from the central side.
Loosen the screws (11) fixing the horizontal belt timing cover (7) and remove it from the horizontal cylinder assembly.
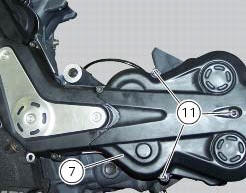
Loosen the screws (12) and remove the filter (10). Apply the recommended threadlocker to the screws (8) and (11).
Once the check has been carried out refit filter (10), screw without tightening the screws (12) and refit the horizontal timing belt cover (7) on the horizontal cylinder assembly by tightening the screws (11) to a torque of 10 nm (min. 9 Nm - max. 11 Nm) for the plastic covers, and 6 nm (min. 5.5 Nm - max. 6.5 Nm) for the carbon ones (sect. 3 - 3, Engine torque settings).

Refit the central timing belt cover (9) by tightening the screws (8) to a torque of 10 nm (min. 9 Nm - max. 11 Nm) for the plastic covers, and 6 nm (min. 5.5 Nm - max. 5.6 Nm) for the carbon ones (sect. 3 - 3, Engine torque settings).
 Spark plugs replacement
Check the colour of the ceramic insulation around the central electrode:
an even, light brown colour indicates the engine is in good condition and
running at the right temperature.
Inspect the c ...
 Checking the coolant level
To the specified intervals in the "scheduled maintenance chart" (sect. 4 - 2)
Check the coolant level contained in
the expansion reservoir, on the right side of the vehicle.
The coolant level mu ...
Other materials:
Display background colour (automatic adjustment)
Instrument panel background colour is set automatically
according to exterior lighting conditions.
When sensor detects "poor lighting" (night), it switches to
black background mode; vice versa when a "significant"
lighting is detected (day), it switches to white background
...
Key-on/key-off using the pin code (immobilizer release)
Key-on can be performed by pressing the button (7) on the
hands free lock (1, fig. 77) Without the presence of the keys
(3, fig. 77) And (4, fig. 77) And entering the pin code on the
dashboard.
Key-off can be performed by pressing the button (6) on the
handlebar / hands free key (7) / engine ...
Removal of the front wheel
Support the bike so that the front wheel is raised from the ground.
Remove the front brake calliper (b) by unscrewing the two screws (a) securing
the calliper to the fork leg; do not
disconnect the calliper from the hose.
Warning
Do not operate the brake lever when the callipers are ...