
Ducati Diavel Service Manual: Reassembly of the clutch-side crankcase cover
Fit the plug (14) and the gasket (13). Fit the plug (17) and the gasket (15).
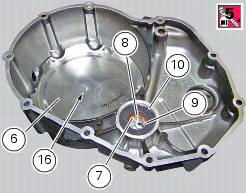
If the bush has been replaced, fully seat the new bush (7) in the slot in the cover using a suitable drift and a press.
If the sealing ring (8) needs to be renewed, fit the new seal into the crankcase cover, positioning it so the side without a spring is facing the circlip (10).
Before fitting, check that the edges of the circlip groove show no sign of burrs which might otherwise damage the sealing ring.
Then fit the shim (9) and the circlip (10).
Important
In order for the sealing ring (8) to function correctly, it must have an assembly clearance that allows the circlip (10) to rotate.
Place the soundproofing panel (18) inside the clutch cover (1).
Position the inner cover (19) on the panel (18), aligning it with the pin (d).
Apply the recommended threadlocker to the screw (16) tighten the retaining screw (16) to a torque of 24 nm (min. 22 Nm - max. 26 Nm) (sect. 3 - 3, Engine torque settings).
 Disassembly of the clutch cover
Remove the plug (14) and its o-ring (13), the plug (17) and its o-ring (15)
from the cover.
Undo the fixing screw (16) of the inner cover (19).
Remove the inner cover (6) and soundproofing p ...
 Refitting the clutch-side crankcase cover
Clean and degrease mating surfaces on the clutch-side crankcase half cover
and crankcase and ensure that locating bush
(12) and the o-ring (11), located in correspondence with the oil way, are
in ...
Other materials:
Tips on how to select the sensitivity level
Warning
The 8 level settings of the dtc were calibrated using tyres of the
same make, model and size as those originally fitted to
the motorcycle.
The use of tyres of different size to the original tyres may alter the operating
characteristics of the system.
In the case of minor differen ...
Programming/reprogramming keys
The dds diagnosis instrument is required in order to programme/reprogramme
the keys. The key programming procedure
is launched from this instrument.
To start the key programming/reprogramming procedure it is necessary to have at
least one of the keys that start the
vehicle available (i.E. I ...
Refitting the rear mudguard
Place the rear mudguard (8) on the swingarm, fitting the screws (9) with
recommended threadlocker.
The screw (9) in the bottom hole of the rear mudguard (8) must be installed with
the washer (r).
Tighten the screws (9) to a torque of 5 nm +/- 10% (sect. 3 - 3, Frame torque
settings).
...