
Ducati Diavel Service Manual: Refitting the timing gears
Before reassembling the removed parts, check timing gears (13) for wear. Change, if necessary.
Important
The timing gears (13) must always be renewed as a pair.
Refitting is the reverse of removal.
Warning
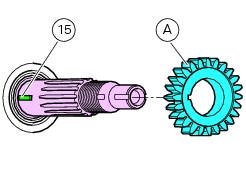
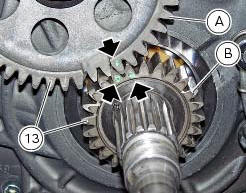
When introducing the driven gear (b) check that the tongue (15) is correctly fitted on the timing system shaft, align the gear slot with the tongue matching the driving gear timing mark (a) with the gear (b).
Important
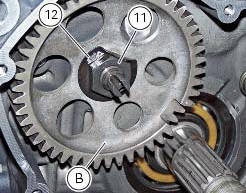
On completion of the refitting operations, check that tab washer (12) is staked against nut (11) in such a way as to prevent the nut from working loose.

 Removal of the timing gears
Slide out driving gear (a) of timing gear pair (13) and remove the woodruff
key (14).
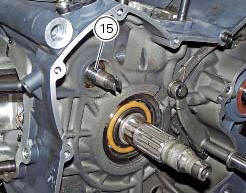
Relieve the staking on the lock washer (12) of the nut (11).
Restrain the driven timing gear by ...
 Removal of the starter motor idler gear
Slide the gear pin (21) complete with the gear (19) and washer (20).
Warning
Pay attention to the washer (20) since it may fall inside the
crankcase half.
At this point, it is possibl ...
Other materials:
Communication antenna
Introduction
The communication antenna enables the hands free system to detect and
communicate with the active or passive key.
The active key is detectable within a range of 1.5 Metres, whereas the passive
key (or active key with flat battery) can
only be detected if placed in contact with ...
Overhaul of the cylinder barrel/piston components
Overhauling the cylinder
Check that the walls of the cylinder bore are perfectly smooth. Measure the
cylinder bore diameter at 50 mm from the top
face and determine the size class to which it belongs in accordance with the
values specified in sect. 3 -
1.1Cylinder/piston. Repeat measurement o ...
Refitting the clutch master cylinder assembly
Insert the clutch master cylinder assembly (3) and the clamp (6) on the left
handlebar, so that the top mating faces
match the mark (z) on the handlebar as shown.
Couple terminal (6) to the clutch master cylinder control and fix them with
the screws (v).
Tighten the retaining screws ...