
Ducati Diavel Service Manual: Removal of the clutch transmission unit
Warning
The manufacturer of the clutch transmission unit (15) advises against servicing of its internal parts due to the safetycritical nature of this component.
Incorrect overhaul of these critical safety components can endanger rider and passenger safety.
The only components that should be renewed are the complete clutch transmission unit, the bleed valve, the seals and the complete clutch pushrod assembly.

Undo the screws (11) and slide out the clutch slave cylinder (r).
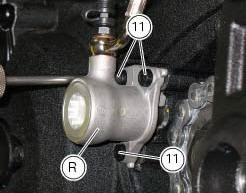
Remove the dust gaiter (16) and the bleed valve (17) and unscrew the screw (18), taking care to recover the gaskets (19): the unit (r) is now disconnected from the pipe (4).
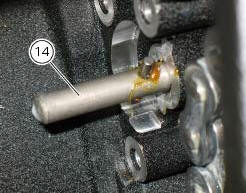
Push in the piston to force out all the fluid from inside the cap.

At this point, it is possible to slide also the clutch gear rod (14).
 Refitting the clutch master cylinder assembly
Insert the clutch master cylinder assembly (3) and the clamp (6) on the left
handlebar, so that the top mating faces
match the mark (z) on the handlebar as shown.
Couple terminal (6) to th ...
 Refitting the clutch transmission unit
Position pipe (4) on the clutch slave cylinder (r).
Position the two seals (19) and tighten the screw (18) to a torque of 23 nm +/-
10% (sect. 3 - 3, Frame torque settings).
Refit the bleed valv ...
Other materials:
Refitting the water pump
Clean the seat on the cover, any parts you intend to reuse, and the impeller
shaft. Then refit as follows.
Fit on the impeller (10) shaft the mechanical seal (9) as indicated in the
figure.
Apply specified lubricant to facilitate the insertion.
Bring the mechanical seal fully home on th ...
Refitting the cylinder/piston assembly
If new units are used, it is necessary to couple the cylinders and pistons of
the same selection (see paragraph "overhaul Of the cylinder
barrel/piston components" of this section).
If the pistons have been separated from their cylinders, before reassembling
these components, position the p ...
Reassembly of rear shock absorber - rocker arm - linkage assembly
Once the needle roller bearings (9) have been removed from the rocker arm
(18), upon reassembly fit a new needle roller
bearing (9) on drift part no. 88713.1071 And lubricate with recommended grease.
Support the rocker arm and drive the needle roller bearings into the rocker arm
bore until t ...