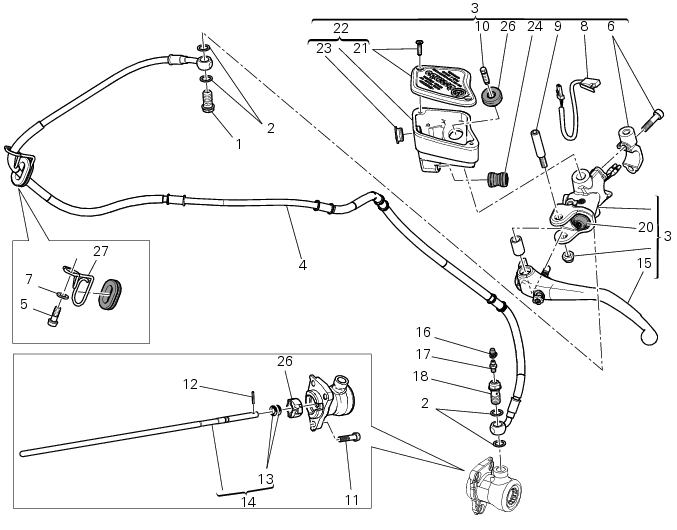
Ducati Diavel Service Manual: Hydraulic clutch control

- Special screw
- Sealing washer
- Clutch master cylinder
- Clutch hydraulic pipe (metal braid)
- Screw
- Spare stand
- Washer
- Microswitch
- Pin
- Bleed valve
- Screw
- Roller
- O-ring
- Clutch control rod
- Clutch lever
- Dust cap
- Bleed valve
- Special screw
- Sealing washer
- Boot
- Plug
- Fluid reservoir assembly
- Inspection plug (replacement part)
- Union
- Oil duct union
- Insert
- Hose clip
Spare parts catalogue
Diavel abs clutch control
Diavel abs clutch
Diavel carbon abs clutch control
Diavel carbon abs clutch
Important
Bold reference numbers in this section identify parts not shown in the figures alongside the text, but which can be found in the exploded view diagram.
- Removal of the clutch master cylinder assembly
- Refitting the clutch master cylinder assembly
- Removal of the clutch transmission unit
- Refitting the clutch transmission unit
 Refitting the throttle twistgrip
Lubricate the ends of the throttle grip cables (10) and the twistgrip race
with the recommended grease.
The closing cable (10) features a writing on the yellow tube, whereas the
opening one (10 ...
 Removal of the clutch master cylinder assembly
Warning
The clutch master cylinder manufacturer advises against servicing of
the clutch master cylinder (1) due to the safetycritical
nature of this component. Incorrect overhaul of this component ...
Other materials:
Anti-pollution system and auto-adaptive strategy
Efficacy of the catalytic converter and oxygen sensors
To comply with current emissions legislation, the diavel is equipped with a
trivalent catalytic converter, which oxidises co
(carbon monoxide) and hc (unburnt hydrocarbons) and reduces nox (nitrogen
oxides).
The image shows the exhaus ...
Refitting the cooling system hoses and unions
Position the pump/radiator sleeve (22) and the radiator/radiator sleeve (23).
Fit sleeve (23) and sleeve (22) to their corresponding fittings (n) and (o), and
bring them fully home on collars (p).
Note
Sleeves (23) and (22) must be oriented so that the grooves (q) match the
tabs (r) on fitt ...
Recovery procedure with no key
When the dashboard is on and the key has been recognised, the hands free
attempts to detect the key every 60 seconds.
If the engine is off and the on/off switch on the handlebar is turned to "run
off", if no key is detected within 10 seconds,
the dashboard switches off automatically.
If t ...