
Ducati Diavel Owners Manual: Default function (resetting ducati default parameters)
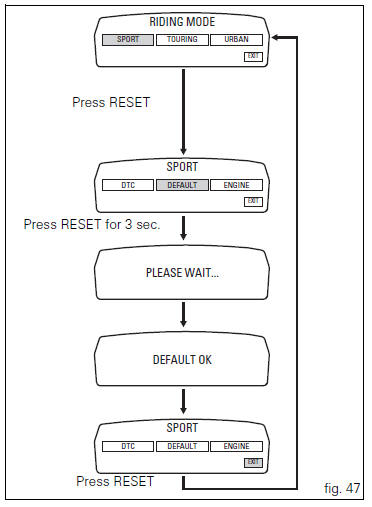
This function resets the parameters set by ducati for each riding style.
To access the function it is necessary to view the "setting" menu page 48, using
button (1, fig. 14) ?"
" or (2, fig. 14) ?" " select the "riding mode"
function and press the
reset button (12, fig. 12) To go to next page.
Use button (1, fig. 14) ?" " or (2,
fig. 14) ?" " to select the riding
mode to be reset to default (initial) parameters and press the button (12, fig.
12) To access the next page. Now, using button (1, fig. 14) ?"
" or (2, fig. 14) ?" " select
"default" indication.
To restore original default parameters, press and hold the reset button (12, fig. 12) For 3 seconds.
For the parameter reset, approx. 3 Seconds are needed during which "please wait..." will appear on the display; at the end of the procedure, "default ok" will appear on the display to indicate that the parameters were reset.
 Important
This procedure restores the parameters for all riding styles.
To exit the setting function, press the reset button (12, fig.
12) Where "exit" is highlighted.
 Engine setting function (engine power control)
This function customises engine power and output.
To access the function it is necessary to view the "setting" menu page 48, using
button (1, fig. 14) ?"
"or (2, fig. 14) ?& ...
 Menu 2 on/off function
This function turns off and back on the menu 2.
If menu 2 is disabled, the functions for average fuel
consumption (cons.Avg), instantaneous fuel consumption
(cons.), Average speed (speed avg), tr ...
Other materials:
Symbols - abbreviations - references
To allow quick and easy consultation, this manual uses graphic symbols to
highlight situations in which maximum care is
required, as well as practical advice or information. Pay attention to the
meaning of the symbols since they serve to avoid
repeating technical concepts or safety warnings th ...
Programming/reprogramming keys
The dds diagnosis instrument is required in order to programme/reprogramme
the keys. The key programming procedure
is launched from this instrument.
To start the key programming/reprogramming procedure it is necessary to have at
least one of the keys that start the
vehicle available (i.E. I ...
Refitting the starter motor gear
Position the washer (20) and the gear (19) in the pin (21) and take the pin
into contact with the crankcase half.
...