
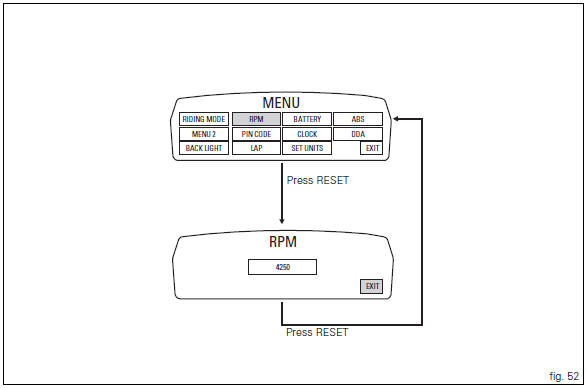
Ducati Diavel Owners Manual: Digital rpm indication function
This function displays the number of rpms for improved accuracy when setting idle rpm.
To access the function it is necessary to view the "setting" menu page 48, using
button (1, fig. 14) ?"
" or (2, fig. 14) ?" " select the "rpm" function and
press the reset button
(12, fig. 12) To confirm.
The display shows the numerical value of the rpm with a precision of 50 rpm.
To exit the setting function, press the reset button (12, fig.
12) Where "exit" is highlighted.
 Backlighting setting function for the instrument panel on Handlebar -
dashboard 2
Backlighting setting function for the instrument panel on Handlebar -
dashboard 2
This function allows backlighting setting of the instrument
panel on handlebar.
To access the function it is necessary to view the "setting" menu page 48, using
button (1, fig. 14) ?&q ...
 Lap activation/deactivation function (lap time)
This function activates and deactivates the lap function (lap
time).
To access the function it is necessary to view the "setting" menu page 48, using
button (1, fig. 14) ?"
&quo ...
Other materials:
Coverage
Warranty defects shall be remedied during customary
business hours at any authorized ducati motorcycle dealer
located within the united states of america in compliance
with the clean air act and applicable regulations of the
united states environmental protection agency and the
california air r ...
Refitting the water pump
Clean the seat on the cover, any parts you intend to reuse, and the impeller
shaft. Then refit as follows.
Fit on the impeller (10) shaft the mechanical seal (9) as indicated in the
figure.
Apply specified lubricant to facilitate the insertion.
Bring the mechanical seal fully home on th ...
Riding mode set indication
This function indicates the "riding style" set for the vehicle.
Three "riding modes" are available: sport, touring and
urban.
Each riding mode can be changed using the "riding
mode" function.
Note
The background of the riding mode (sport, touring
or urban) i ...