
Ducati Diavel Owners Manual: Entering pin code function for vehicle release
This function turns on the motorcycle "temporarily" in the case of hf (hands free) system "malfunctions".
To activate the function, press the "emergency" hands free button (7, fig. 87) If the motorcycle cannot be turned on using the normal starter button.
After pressing the button, the instrument panel activates the "insert pin code" indication on the display with four dashes "- - - -" in the bottom line highlighted in green to enter the 4 digit pin code.
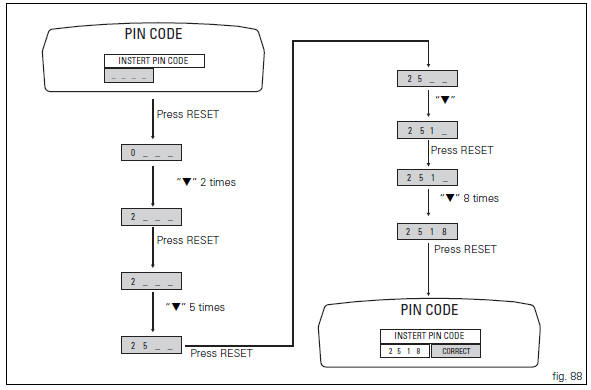
Entering the code: press the reset button (12, fig. 12); Each time you press the
button (2, fig. 14) ?" "
"
the displayed
number increases from "0" to "9" and then returns to "0";
to confirm the number, press the reset button (12, fig. 12);
Repeat the procedure until inserting the fourth digit;
press the reset button (12, fig. 12) Again to confirm.
If the code is incorrect, the instrument panel will return to the four dashes " - - - - " indication in order to enter the code again.
 Note
Note
There is no limit to the number of times the code can be re-entered; the instrument panel will turn off automatically 120 seconds after an attempt to enter the code.
If the entered code was correctly, the message "correct" will flash on the display for 3 seconds. After 3 seconds, the instrument panel will return to the "normal" view (with all indications active).
From this moment, the vehicle can be started using the start button (key-on).
 Note
Note
The vehicle can be started until a key-off is performed; if the problem still persists upon the next starting attempt, repeat the procedure from the beginning in order to start the motorcycle "temporarily".
 Important
If this procedure is necessary in order to start the vehicle, contact an authorised ducati service centre as soon as possible to fix the problem.
 Key-on/key-off using the pin code (immobilizer release)
Key-on can be performed by pressing the button (7) on the
hands free lock (1, fig. 77) Without the presence of the keys
(3, fig. 77) And (4, fig. 77) And entering the pin code on the
dashboard.
...
 Lh switch
Dip switch, light dip switch, two positions (fig. 89):
(A) every time pressed down light switches from low
beam on to low beam and high beam
on .
(B) pushed to the side = high
beam ...
Other materials:
Refitting the crankshaft/connecting rod assembly
Install the connecting rod assembly (6) and (2) in the crankcase, carry out
the shimming and crankcase half reassembly
procedure as described in sect. 9 - 9.2, Reassembly of the crankcase halves.
Important
Make sure that the connecting rods (2) are correctly positioned in the
cylinders. Incor ...
Refitting the cylinder heads pulleys/fixed tensioners
Check that the keyway on the end of the camshaft is in good condition and
without burrs.
Fit a woodruff key (b) in the keyway of each camshaft.
Fit the pulley (11) on the camshaft, inserting the woodruff key in the in the
slot (c) in the pulley.
Apply the recommended grease to the t ...
Introduction to the engine control system
The engine control system used on the diavel consists of the following
elements:
Ride-by-wire system (motorised throttle valves with electric actuator,
throttle grip position sensor and throttle valve
position sensor)
One injector per cylinder installed downstream of throttle valve
On ...