
Ducati Diavel Owners Manual: Lh switch
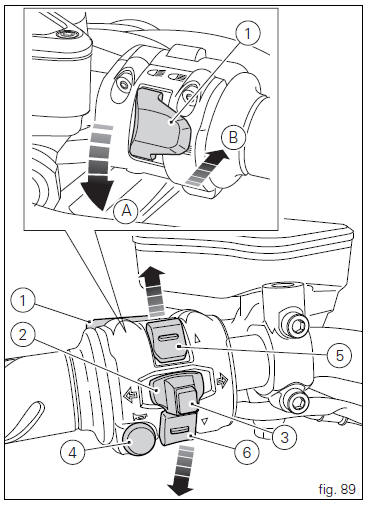
- Dip switch, light dip switch, two positions (fig. 89):
(A) every time pressed down light switches from low
beam on
 to low beam and high beam
on .
.
(B) pushed to the side
 = high
beam flasher (flash), "start-stop lap" function. - Button
 = three-position turn
indicator (fig. 89): Centre position = off;
Position  = left turn;
Position  = right turn.
- Turn indicator off, "riding style" activation and menu navigation button.
- Button
 = warning horn.
 - Navigation menu, display scroll and trip1 and trip2 reset button.
- Navigation menu, display scroll button.
 Entering pin code function for vehicle release
This function turns on the motorcycle "temporarily" in the
case of hf (hands free) system "malfunctions".
To activate the function, press the "emergency" hands free
...
 Clutch lever
Lever (1) disengages the clutch. It features a dial adjuster (2)
for lever distance from the twistgrip on handlebar.
The lever distance can be adjusted through 10 clicks of the
dial (2). Turn clo ...
Other materials:
Replacing the front phonic wheel sensor
Disconnect the front abs sensor (2) connector (a) from the main electric
wiring.
Open all the retainer clamps of the front abs sensor cable (2): refer to table
of sect. 7 - 6, Flexible wiring/hoses
positioning.
Loosen retaining screw (1) and remove the front abs sensor (2) with
ca ...
Adjusting the front fork
The front fork used on this motorcycle has rebound,
compression and spring preload adjustment.
The settings are adjusted using external adjuster screws.
To adjust rebound damping (fig. 109);
To adjust spring preload (fig. 109);
To adjust compression damping (fig. 110).
Park the mo ...
Changing the clutch fluid
Warning
Clutch fluid will damage painted surfaces if spilled on them. It is
also very harmful if it comes into contact with the skin or
with the eyes; in the event of accidental contact wash the affected area with
abundant running water.
Remove cover (1) and membrane from the clutch fluid res ...