
Ducati Diavel Service Manual: Removal of the rear wheel eccentric hub and rear wheel shaft
Before removing the eccentric hub, you must first remove the parts listed below.
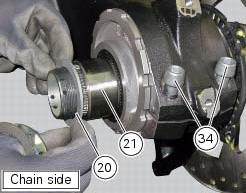
Slacken off the screws (34).
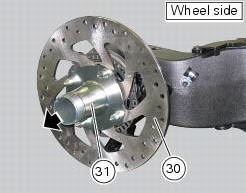
Remove the spacer (20) and the inner ring (21) on the chain side and remove the wheel shaft (31) with the brake disc (30) from the opposite side.
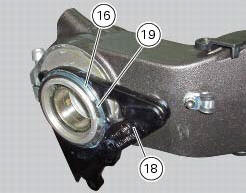
Remove the circlip (19) on the wheel side of the eccentric hub.
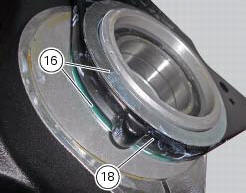
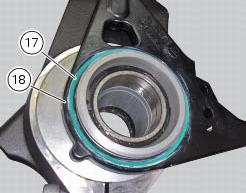
Remove washers (16), the o-ring (17) and the calliper holding plate (18) with the other o-ring (17).
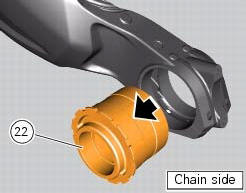
Withdraw the eccentric hub (22) from the chain side of the swingarm.
Note
The rear hub is a component particularly critical to the dynamic safety of the motorcycle; under no circumstances may the internal components of the hub be serviced or repaired. The hub may be ordered as a complete assembly, spare part no. 756.2.013.1A.
 Swingarm
Swingarm pivot
Washer
Special screw
Bush
Sealing ring
Roller bearing
Special screw
Rear swingarm
Spacer
Bearing
Spacer
Spacer
Hose clip
Pin
Chain slider (lower)
Wa ...
 Refitting the rear wheel eccentric hub and rear wheel shaft
Refitting is the reverse of removal, with attention to the following points.
If the calliper bracket locating pin (14) was removed, apply the recommended
threadlocker on reassembly.
Tighten th ...
Other materials:
Bleeding of the abs hydraulic system
If some "sponginess" is detected on the brake control, due to air bubbles in
the system, bleed the system, as indicated in
sect. 4 - 3, Changing the brake fluid.
Before bleeding a brake pump, move back the calliper pistons, as indicated in
(sect. 4 - 3, Changing the brake fluid) to Drain in ...
Removal of the starter motor idler gear
Slide the gear pin (21) complete with the gear (19) and washer (20).
Warning
Pay attention to the washer (20) since it may fall inside the
crankcase half.
At this point, it is possible to remove the starter motor as described in
sect. 6 - 3, Starter motor. ...
Airbox - throttle body
Airbox
O-ring
Injector
Throttle body assembly
Screw
Clamp
Intake manifold
Screw
Pressure sensor
Screw
Clamp
Hose
Sealing washer
Intake manifold
Sealing washer
Screw
Screw
Spacer
Bracket
Rubber pad
Clamp
Hose
Clamp
Union
Washer
Hose
Cable gro ...