
Ducati Diavel Owners Manual: Hands free system key-on and key-off
Key-on consists in turning on the hands free system and all of its electronic devices.
Key-off consists in turning off the hands free system and all electronic devices, and makes sure the engine is turned off.
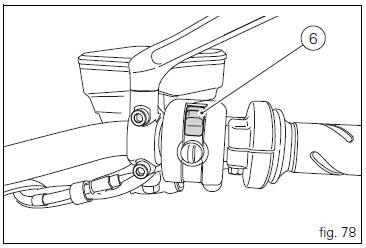
Key-on is done using the button (6) on the handlebar on the right switch or using the emergency button (7) on the hands free lock (1, fig. 77).
Key-off is done using the button (6) on the handlebar on the right switch or using the button (7) on the hands free lock (1, fig. 77).
 Note
Note
The use of one of the two buttons (6) or (7) does not exclude the other, ex.: If i turn it on with one, i can turn it off with the other and vice versa.
Key-on can only occur in the presence of one of the two keys (3, fig. 77) Or (4, fig. 77) Or using the pin code.
Key-off can also occur without a key (3, fig. 77) Or (4, fig. 77).
Key-off occurs when the speed of the motorcycle is equal to zero, pressing the button (6) on the handlebar or by pressing the hands free button (7); at a speed other than zero, only by pressing the hands free button (7).
 Note
Note
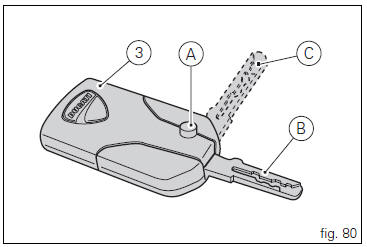
With the vehicle in key-on and "engine off", if the presence of the active key (3, fig. 80) Is not detected for thirty consecutive seconds, the motorcycle will turn off automatically without any action by the rider.
 Hands free system
The hands free system consists of:
Hands free lock;
Antenna;
Active key;
Passive key;
Electric cap (optional).
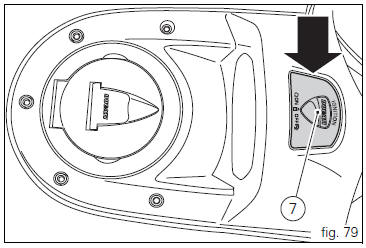
The "hands free" button (7, fig. 79) Is located on tank fron ...
 Key-on/key-off using the red key on the handlebar with the active key
A key-on can be performed by pressing the red key (6) on
the handlebar in the hands free on/off position and in
the presence of the active key (3, fig. 77).
Note
The active key (3, fig. 77) Has a ...
Other materials:
Operating principle
Introduction
The hands free system features two separate on/off buttons, either one of
which may be used as preferred by the rider.
For practical reasons, we recommend using the button on the handlebar rather
than the button located underneath the
plastic shield covering the hands free syst ...
Removing of the abs control unit
Drain the hydraulic fluid that is inside the front and rear braking system
tubes by disconnecting them from the master
cylinder and the calliper (sect. 4 -3, Changing the brake fluid).
Disconnect the connector (a) of the abs control unit (6).
Loosen the screws (16) that retain the abs ...
Removal of the expansion tank
Loosen the clamp (6), open the hose guide (a) and slide the hose (7) out of
the radiator.
Open clamps (14) and release the hoses that pass through them.
Loosen the screws (16).
Remove the tank (12) with its hoses (7) and (20) and the support (15).
Loosen the clamp (19) to r ...