
Ducati Diavel Owners Manual: Indicator air - air temperature
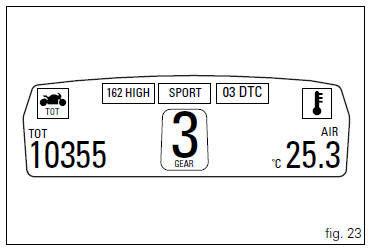
This function shows the external temperature.
Display limits: -39C ÷ +124C
In the event of a sensor fault (-40C,+125C or disconnected), a string of dashes "- - -" (not flashing) is displayed and the "engine/vehicle diagnosis - eobd" light (7, fig. 4) Comes on.
 Note
Note
When the vehicle is stopped, the engine heat could influence the displayed temperature.
When the detected temperature drops to 4C (39f), the display warns that the formation of ice is possible. The indication turns off when the temperature rises to 6C (43f).
 Warning
This warning does not exclude the possibility of icy road sections even at temperatures above 4C (39f); when external temperatures are "low" it is always recommended to ride carefully, particularly on sections that are not exposed to the sun and/or on bridges.

 Indicator trip time - trip time
This function shows the vehicle trip time.
The calculation is made considering the time travelled since
the last trip 1 reset. When trip 1 is reset, the value is set to
zero.
The active phase ...
 Engaged gear indicator
This function displays the gears (1, fig. 25).
The instrument panel receives information and indicates the
engaged gear or "n" for neutral.
Note
In the case of a gear sensor "err ...
Other materials:
Refitting the starter motor gear
Position the washer (20) and the gear (19) in the pin (21) and take the pin
into contact with the crankcase half.
...
Riding safety
The points given below are applicable for every day
motorcycle use and shoud be carefully observed for safe and
effective vehicle operation.
A motorcycle does not provide the impact protection of an
automobile, so defensive riding in addition to wearing
protective apparel is extremely importa ...
Immobilizer override procedure
This procedure makes it possible to "temporarily" turn on
the motorcycle if the hf (hands free) system is not working.
Note
The pin code function must be activated by entering
your 4 digit pin in the instrument panel, otherwise the
vehicle cannot be turned on temporarily in the case ...