
Ducati Diavel Service Manual: Swingarm
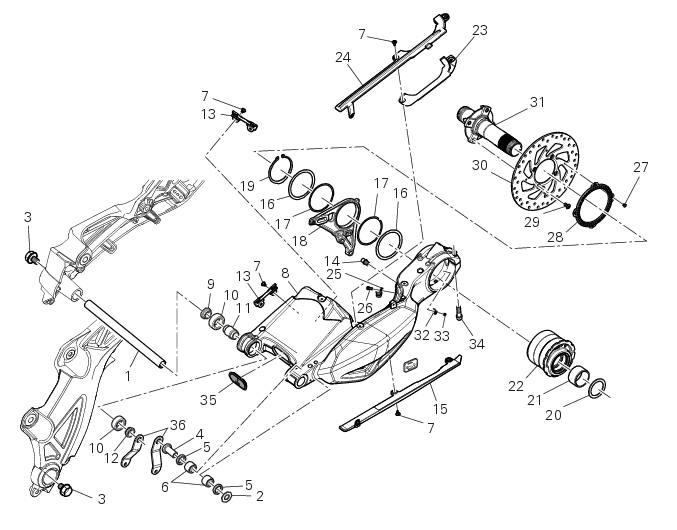
- Swingarm pivot
- Washer
- Special screw
- Bush
- Sealing ring
- Roller bearing
- Special screw
- Rear swingarm
- Spacer
- Bearing
- Spacer
- Spacer
- Hose clip
- Pin
- Chain slider (lower)
- Washer
- O-ring
- Calliper mounting bracket
- Circlip
- Spacer
- Inner ring
- Hub
- Cable grommet
- Chain slider (upper)
- Cable grommet
- Screw
- Screw
- Phonic wheel (rear)
- Screw
- Brake disc (rear)
- Wheel axle (rear)
- Base
- Screw
- Screw
- Plug
- Bracket
Spare parts catalogue
Diavel abs rear wheel axle
Diavel abs swingarm
Diavel carbon abs rear wheel axle
Diavel carbon abs swingarm
Important
Bold reference numbers in this section identify parts not shown in the figures alongside the text, but which can be found in the exploded view diagram.
- Removal of the rear wheel eccentric hub and rear wheel shaft
- Refitting the rear wheel eccentric hub and rear wheel shaft
- Removal of the swingarm
- Overhauling the rear swingarm
- Refitting the swingarm
 Refitting the shock absorber support
If you had removed them, apply recommended grease on the threads of the
adjusters (4) and the ring nuts (3) having
care not to have grease on the surface (c) of the adjusters.
Tighten the adjust ...
 Removal of the rear wheel eccentric hub and rear wheel shaft
Before removing the eccentric hub, you must first remove the parts listed
below.
Slacken off the screws (34).
Remove the spacer (20) and the inner ring (21) on the chain side and remove the ...
Other materials:
Removing of the rear brake control
Warning
The brake master cylinder manufacturer advises against servicing the
brake master cylinder due to the safety critical
nature of this component.
Incorrect overhaul can endanger the rider and passenger.
Maintenance operations on these units are limited to renewal of the following
par ...
Lcd unit functions
Speedometer.
Gives road speed
Rev counter.
Indicates engine revs per minute.
Clock.
Water temperature indicator.
Indicates engine coolant temperature.
Important
Stop riding if the temperature reaches the maximum value, otherwise the
engine might be damaged.
...
Lap activation/deactivation function (lap time)
This function activates and deactivates the lap function (lap
time).
To access the function it is necessary to view the "setting" menu page 48, using
button (1, fig. 14) ?"
" or (2, fig. 14) ?" " select the "lap" function and
press the reset button
...