
Ducati Diavel Service Manual: Reassembly of the front half-fairings
Fit the clips (2) on the front rh half-fairing (1).
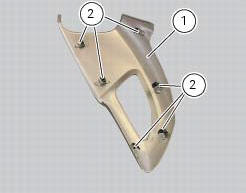
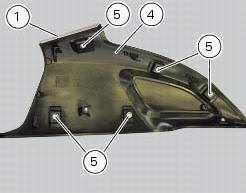
Join the rh support (4) and the front rh half-fairing (1) and keep them in position by starting the screws (5).
Note
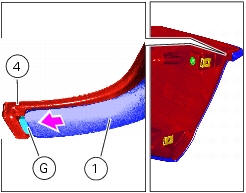
To mount the rh support (4) in a proper way, it is necessary to insert the tab (g) of the front rh half-fairing (1) in the slot available in the support.
Tighten the screws (5) to a torque of 5 nm +/- 10% (sect. 3 - 3, Frame torque settings).
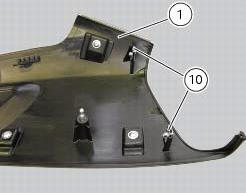
Fit the clips (10) on the front rh half-fairing (1).
Follow the same procedure to reassemble the lh half-fairing (12).
 Disassembly of the front half-fairings
Undo the screws (5) and separate the rh support (4) from the front right
half-fairing (1).
Follow the same procedure to disassemble the lh half-fairing (12). ...
 Refitting the fuel tank fairings
Make sure that the following components are fitted on the tank fairing (22):
Spacers (18);
Seals (20).
Fit the clips (19) to the central cover (22) at the positions shown,
inserting the tab ...
Other materials:
Gearchange mechanism
Return spring
Washer
Special screw
Gear pawl assembly
Interlock plunger holder
Sealing washer
Detent ball spring
Ball
Circlip
Selector claw return spring
Shim washer
Ring
Nut
Selector drum control fork
Gearchange lever pin
Shaft with gearchange lever arm
Gearch ...
Reassembly of the timing pulleys
Fit the pulley (11) on the flange (24), aligning the timing mark (d) on the
pulley with the timing mark on the (e) on the
flange.
Install the washer (23) up against the pulley, aligning the timing notch (f)
with the timing marks on the pulley and the
flange.
Insert the three screws (22) ...
Inspection of the gear selector drum
Use a gauge to measure the clearance between fork pin and the slot on the
selector drum.
If the service limit is exceeded, determine which part must be replaced by
comparing these dimensions with those of new
components (sect. 3 - 1.1, Gearbox).
Also check the wear on the drum support pin ...