
Ducati Diavel Service Manual: Refitting the air filters
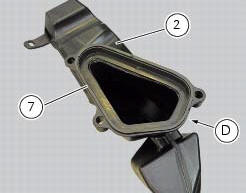
Apply universal sealant in the air duct (2) and (6) groove (d).
Fit seal (7) in the groove (d) having care to place it correctly in the relevant seat so as to avoid abnormal wrinkles.
Pull out the filter cartridge (1) from the seat in the airbox.

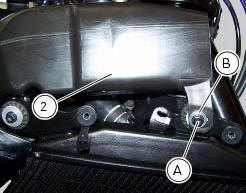
Position the rh air duct (2).
Start the screws (1) and the screw (a) with washer (b).
Tighten the screws (1) to a torque of 3.5 Nm +/- 10% (sect. 3 - 3Frame torque settings) and screw (b) to a torque of 10 nm +/- 10% (sect. 3 - 3, Frame torque settings).
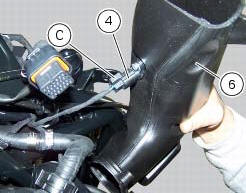
Proceed in the same way to refit the lh intake duct (5), and connect the connector (c) of the air temperature sensor (4).
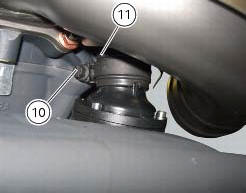
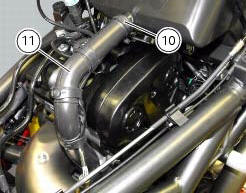
Check that the clips (10) securing hose (11) are positioned as shown.
 Removal of the air filters
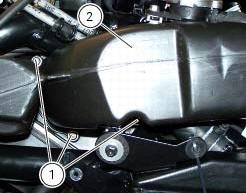
Work on the vehicle right side, loosen screws (3) that secure the intake duct
(2) to the airbox, and the radiator retaining
screw (a); recover the washer (b).
Remove the intake duct (2).
...
 Exhaust system
Screw
Bush
Vibration damper mount
Silencer
Washer
Screw
Bracket
Nut
Nut
Upper heat guard
Screw
Washer
Central heat guard
Spacer
Clip nut
Long exhaust spring
Plug ...
Other materials:
Adjusting the throttle cable
The throttle grip in all steering positions must have free play, measured on
the periphery of the flange of the grip, of 1.5 -
2.0 Mm.
If necessary, adjust using the adjusters (1) and (2) located on the steering
tube on the right side of the motorcycle.
Adjuster (1) adjusts the throttle o ...
Fuel system circuit
The fuel system circuit consists of:
An electric pump, driven by the injection relay, which is in turn
controlled by the ecu (engine control unit)
A fuel filter
A pressure regulator
Two injectors (one per cylinder, located downstream of throttle valve)
The plastic mounting shown in t ...
Key-on/key-off using the pin code (immobilizer release)
Key-on can be performed by pressing the button (7) on the
hands free lock (1, fig. 77) Without the presence of the keys
(3, fig. 77) And (4, fig. 77) And entering the pin code on the
dashboard.
Key-off can be performed by pressing the button (6) on the
handlebar / hands free key (7) / engine ...