
Ducati Diavel Service Manual: Removal of the throttle twistgrip
Peel back the rubber sleeve (a) protecting the throttle control cables.
Undo the screws (b) of the throttle grip (6) and open the command.
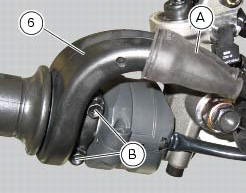
Disconnect the throttle grip cables (10) by unhooking the cable ends (c) from their seats.
Remove the throttle twistgrip (6) from the handlebar.
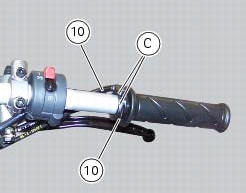
To replace the throttle grip cables, it is necessary to remove it from the throttle body (sect. 8 - 6, Removal the airbox and throttle body).
Replacement throttle cables are supplied complete with adjusters.
 Refitting the handlebar
Position the handlebar (4) so that the external lower corner of the marks (a)
on the handlebar matches the upper internal
corner of the lower u-bolts (b) as shown.
Apply the recommended grease ...
 Refitting the throttle twistgrip
Lubricate the ends of the throttle grip cables (10) and the twistgrip race
with the recommended grease.
The closing cable (10) features a writing on the yellow tube, whereas the
opening one (10 ...
Other materials:
Default function (resetting ducati default parameters)
This function resets the parameters set by ducati for each
riding style.
To access the function it is necessary to view the "setting" menu page 48, using
button (1, fig. 14) ?"
" or (2, fig. 14) ?" " select the "riding mode"
function and press the
r ...
Hands free system key-on and key-off
Key-on consists in turning on the hands free system and all
of its electronic devices.
Key-off consists in turning off the hands free system and all
electronic devices, and makes sure the engine is turned off.
Key-on is done using the button (6) on the handlebar on the
right switch or using ...
Removal of the rear wheel eccentric hub and rear wheel shaft
Before removing the eccentric hub, you must first remove the parts listed
below.
Slacken off the screws (34).
Remove the spacer (20) and the inner ring (21) on the chain side and remove the
wheel shaft (31) with the brake disc
(30) from the opposite side.
Remove the circlip (19 ...