
Ducati Diavel Service Manual: Final drive
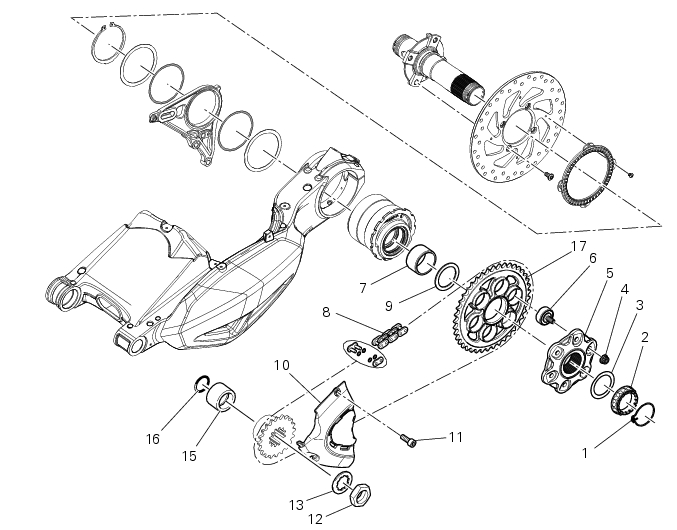
- Circlip
- Nut
- Washer
- Nut
- Rear sprocket flange
- Cush drive bush
- Inner ring
- Chain
- Spacer
- Chain cover
- Screw
- Nut
- Lock washer
- Front sprocket
- Spacer
- O-ring
- Rear sprocket
Spare parts catalogue
Diavel abs gearbox
Diavel abs rear wheel axle
Diavel carbon abs gearbox
Diavel carbon abs rear wheel axle
Important
Bold reference numbers in this section identify parts not shown in the figures alongside the text, but which can be found in The exploded view diagram.
- Inspecting the final drive
- Removing of the front sprocket
- Refitting the front sprocket
- Replacing of the rear sprocket
- Refitting the rear sprocket
- Lubricating the chain
 Refitting the swingarm
Apply the recommended threadlocker to the screws (7).
Install the lower chain guard (15) on the swingarm (8), fastening it with the
screws (7): tighten the screws (7) to a torque
of 4 nm +/- 10% ...
 Inspecting the final drive
To check the wear of the final drive, visually check the pinion (14) and
sprocket (17). If the teeth are found to worn as
shown in the figure (dotted line), the sprocket must be renewed.
T ...
Other materials:
Removal of the tool tray
To remove the tool tray unit from the lateral footrests, loosen the screws
(40) and remove the splashguard (20).
Undo the screws (15) and remove the cover (16).
Move the wiring branch from the seat (s) on the tool tray.
Loosen the screws (24) to remove the tool tray unit (23) from ...
Backlighting setting function for the instrument panel on Handlebar -
dashboard 2
This function allows backlighting setting of the instrument
panel on handlebar.
To access the function it is necessary to view the "setting" menu page 48, using
button (1, fig. 14) ?"
" or (2, fig. 14) ?" " select the "back light" function
and press ...
Headlight aim
The motorcycle must be perfectly upright with the tires inflated to the
correct pressure and with a rider seated, perfectly
perpendicular to the longitudinal axis.
Position the motorcycle 10 metres from a wall or a screen.
On the wall or surface, draw a horizontal line at the same height fr ...