
Ducati Diavel Service Manual: Removal of the expansion tank
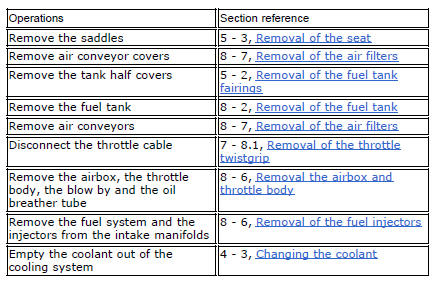
Loosen the clamp (6), open the hose guide (a) and slide the hose (7) out of the radiator.
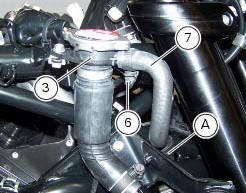
Open clamps (14) and release the hoses that pass through them.
Loosen the screws (16).
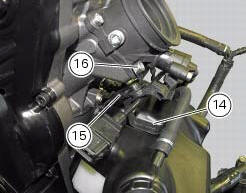
Remove the tank (12) with its hoses (7) and (20) and the support (15).
Loosen the clamp (19) to remove the hoses (7) and (20) from the tank.
Loosen the screws (18) and remove the supporting plate (15).
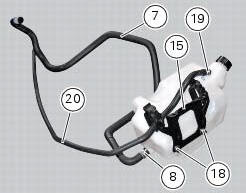
 Coolant expansion tank
Plug
Screw
Fuel filler flange
Clip nut
Clamp
Hose clip
Valve/tank hose
Clamp
Screw
Spacer
Rubber mounting
Expansion reservoir
Filler cap
Hose clip
Support
Screw
...
 Refitting the expansion tank
If the support (15) has been removed, place the hose clamps (14) on the
bracket (15) orienting them as indicated.
Fully press the pins (a) to block the clamps (14) until pins surfaces (b) are at ...
Other materials:
Adjusting the front fork
The front fork used on this motorcycle has rebound,
compression and spring preload adjustment.
The settings are adjusted using external adjuster screws.
To adjust rebound damping (fig. 109);
To adjust spring preload (fig. 109);
To adjust compression damping (fig. 110).
Park the mo ...
Removal of the cooling system hoses and unions
Loosen the clips (21) that secure the radiator/thermostat sleeve (40) and the
radiator/plug sleeve (24) to the water
radiators.
Loosen clips (25) and (43) that secure the breather pipe (26) to the
radiator/plug sleeve (24) and to the left radiator.
Loosen the clips (34) securi ...
Refitting the rear sprocket
Check the cush drive bushes (6) condition and, if necessary, replace them by
removing them from the flange.
Refitting is the reverse of removal.
Apply recommended grease on the rear sprocket flange (5) external diameter.
Place the rear sprocket flange (5) on sprocket (17) by inserting it ...