
Ducati Diavel Service Manual: Removing the frame and the lateral footrests
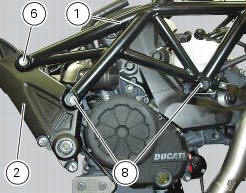
Loosen the two special screws (6) to separate the frame (1) from the lateral brackets (2) and (3).
On the left side of the vehicle block retaining pins (9) and loosen the nuts (8) on the right side at the same time.
Slide out the retaining pins (9) and remove the frame (1) from the lateral brackets and the engine block.

 Removal of the tool tray
To remove the tool tray unit from the lateral footrests, loosen the screws
(40) and remove the splashguard (20).
Undo the screws (15) and remove the cover (16).
Move the wiring branch ...
 Checking the frame
Check the dimensions of the frame against the dimensions shown here to
determine whether it needs to be realigned or
renewed.
Important
Damaged frames must be changed, not repaired. Any work carr ...
Other materials:
Parking
Park the stopped motorcycle on the side stand.
Turn the handle completely to the left or right.
If this operation is performed within 60 seconds after the
engine stop, the message "waiting for lock" (fig. 120) Will
appear on the display of the instrument panel for approx.
5 Seco ...
Specific tools for the frame
88713.1072 Drift to install half bearing in bottom yoke
88713.2562 Chain assembly tool
88713.1058 Wrench for steering shaft nut
88713.1062 Tool for installing steering head bearings
88713.2951 Rear wheel balancing tool
88713.3211 Wrench for adjustment of the eccentric hu ...
Removal of the rear brake calliper
Important
The brake manufacturer advises against any servicing of the internal
components of brake callipers or the master cylinder.
Incorrect overhaul of these critical safety components can endanger rider and
passenger safety.
Before removing the parts in question, you must first carry ou ...